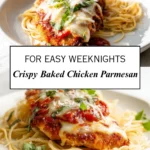
Crispy Baked Chicken Parmesan That Never Turns Soggy

If you’ve ever craved a cozy, Italian-American dinner without the heavy frying or restaurant bill, this dish will feel like a warm welcome home. I still remember the first time I swapped my usual skillet-fried version for a baked chicken parmesan recipe. I expected a decent meal, but what came out of the oven honestly surprised me. The chicken stayed crisp, the cheese melted into a golden blanket, and the whole thing tasted lighter yet just as satisfying. As you make your own version, you’ll notice how easily it fits into a weeknight routine while still giving you that “special dinner” feeling. And since baked chicken parmesan skips the oil splatter, you get comfort food with less fuss and a cleaner kitchen.
Table of Contents
What Is Baked Chicken Parmesan (History & Origins)
You’ve probably seen variations of this dish in countless Italian-American restaurants, but its roots trace back to classic Italian “parmigiana” recipes made with vegetables like eggplant or zucchini. When Italian immigrants adapted those traditions to American kitchens, chicken quickly became the star. Over the years, the fried cutlet version took center stage, but the oven-baked style has gained serious popularity because it gives you the same layered comfort without the heaviness.
Why the Baked Method Works
When you bake the chicken instead of frying, you still get that crisp bite thanks to panko breadcrumbs and a hot oven. The heat dries the coating just enough to mimic a shallow fry. Then, once the chicken is cooked through, you add sauce and cheese so the crust stays firm rather than turning soggy. The result feels balanced—crispy on the outside, juicy inside, and full of familiar flavors you know from your favorite Italian-American plates.
Key Ingredients That Define the Dish
This recipe leans on simple pieces that come together beautifully: boneless chicken breasts, a crunchy breadcrumb coating, rich marinara, and plenty of mozzarella and Parmesan. You’ll notice that using a thinner cut of chicken helps everything cook evenly and avoids over-baking, which makes a big difference in the final texture.
Ingredients & Prep: What You Need and How to Prep Your Chicken
Before you start assembling anything, laying out your ingredients will make the process smoother. Here’s everything you need:
Ingredients
- 2 large boneless, skinless chicken breasts, sliced horizontally into thin cutlets
- 1 cup panko breadcrumbs
- ½ cup grated Parmesan cheese
- 1 cup shredded mozzarella cheese
- 1 cup marinara sauce
- 2 large eggs, beaten
- ½ cup all-purpose flour
- 1 tablespoon olive oil
- 1 teaspoon Italian seasoning
- 1 teaspoon garlic powder
- ½ teaspoon salt
- ½ teaspoon black pepper

Preparing the Chicken
When you slice the chicken into cutlets, you create thinner pieces that cook quickly and stay tender. If some pieces look uneven, lightly pound them so they match in thickness. This simple step helps prevent overcooking and makes the breading cling more easily.
Building the Breading Station
Set out three shallow bowls: one with flour, one with the beaten eggs, and one with the breadcrumb mixture. Combine the panko, Parmesan, Italian seasoning, garlic powder, salt, and pepper. Coating the chicken in this order—flour, egg, then breadcrumbs—helps the crust stick well and crisp evenly as it bakes.
Step-by-Step Baking Instructions (Easy Weeknight Method)
Preheat the Oven
Warm your oven to 425°F. This higher temperature gives your breadcrumb coating that golden, crispy finish without deep frying.
Bread the Chicken
Lightly dust each cutlet in flour, dip it in the egg mixture, then press both sides into the breadcrumb mixture. You might notice the breadcrumbs feel looser than traditional fine crumbs, but that coarse texture is exactly what creates that restaurant-style crunch.

Start the Bake
Arrange the coated chicken on a greased baking sheet or a parchment-lined tray. Drizzle or brush the tops with a little olive oil. Bake the chicken for about 15 minutes, or until the coating begins to turn lightly golden.
Add the Sauce and Cheese
Pull the tray from the oven and spoon marinara over the center of each piece. Sprinkle on mozzarella, then return the chicken to the oven for another 8 to 10 minutes. The cheese melts into a gooey top layer, and the sauce warms without soaking into the breading too early.

Optional Broil
If you like a bubbly, golden finish, switch your oven to broil for 1 to 2 minutes. Just keep an eye on it—broiling can go from “perfect” to “too dark” pretty quickly.
Dietary Variations & Substitutions
You might want to tailor this dish to fit dietary needs, and fortunately, baked chicken parmesan adapts beautifully.
Gluten-Free Option
Swap the all-purpose flour for a gluten-free blend and use gluten-free breadcrumbs. They crisp up nicely and keep the texture close to the classic version.
Low-Calorie or Lighter Version
Use part-skim mozzarella and cut the cheese amount in half. Serve your chicken with roasted vegetables or a simple salad instead of pasta. Because the recipe already skips frying, you’re starting with a naturally lighter base.
Keto or Low-Carb
Replace the breadcrumbs with crushed pork rinds or seasoned almond flour. You’ll keep the crunchy exterior while lowering carbs. Serve with zucchini noodles or spaghetti squash.
Vegetarian or Vegan
Eggplant works wonderfully as a plant-based alternative. Slice it into rounds, bread it the same way, and bake until tender. For vegan versions, use dairy-free cheese shreds and an egg substitute.
Halal Adaptation
Most of the ingredients are already Halal-friendly, so simply ensure the chicken is certified Halal. Everything else in the recipe remains the same.
Tips for Best Results & Common Mistakes to Avoid
Keep the Chicken Dry
Before you start breading, pat the chicken pieces dry. Moisture prevents the coating from sticking and can create steam, which softens the crust.
Let the Oven Do the Work
Avoid flipping the chicken too often. A single flip or no flip at all keeps the breading intact.
Don’t Add Sauce Too Early
Adding marinara too soon will soften the crust. Always wait until the end of baking when the chicken is nearly finished.
Check Doneness the Easy Way
Make sure the internal temperature reaches 165°F, or slice into one piece to confirm it’s fully cooked. Because the cutlets are thin, they cook quickly.
Storage, Reheating & Make-Ahead Tips
If you’re prepping ahead or using leftovers, you’ll appreciate how forgiving this dish is. Store your chilled chicken in an airtight container for up to four days. When reheating, choose the oven over the microwave to maintain the crisp coating. A quick 10–12 minutes at 350°F usually brings everything back to life without drying the chicken.
You can also bread the chicken in advance. Keep it refrigerated for several hours or freeze it on a tray before transferring it to a freezer bag. When you’re ready to cook, bake the chicken straight from frozen while adding a few extra minutes to the timer.

You’ll find that even after a couple of days, baked chicken parmesan still tastes fresh and flavorful because the oven method preserves the texture far better than frying.
Creating this dish in your own kitchen brings together comfort, convenience, and a touch of Italian-American tradition. Once you’ve tried it, you might wonder why you didn’t switch to the baked version sooner. Whether you’re serving it over pasta, pairing it with vegetables, or enjoying it on its own, baked chicken parmesan delivers that nostalgic flavor with far less effort—and it fits beautifully into busy weeknights or relaxed weekends.
FAQ
How long should I bake chicken for baked chicken parmesan?
You’ll want to bake the chicken at around 400–425°F. Depending on the thickness of your chicken cutlets, bake about 15–20 minutes until the coating is golden and crispy and the chicken is nearly cooked through. Then top with sauce and cheese and bake a few more minutes until the cheese melts and bubbles.
How can I keep the breading crispy and prevent soggy chicken parmesan?
Pat your chicken dry before breading and use a coarse breadcrumb mix (like panko) for extra crunch. Add the tomato sauce and cheese toward the end of baking — not at the start — so the crust has time to crisp up first before getting sauced.
Can I make baked chicken parmesan gluten-free or fit other dietary needs?
Yes. For gluten-free, swap regular flour and breadcrumbs with gluten-free flour blends and gluten-free crumbs. For lighter or low-carb versions, use part-skim cheese or substitute crumbs with almond flour or crushed low-carb alternatives.
What cheeses work best for baked chicken parmesan?
Mozzarella is the top choice for melty, gooey texture. Parmesan adds sharp, salty flavor. If you like a milder or slightly different taste, you can also use provolone or a blend of similar melting cheeses.
Get inspired with more mouthwatering recipes! Follow me on Facebook and Pinterest for new cooking ideas every week.
Print
Crispy Baked Chicken Parmesan
- Total Time: 40 minutes
- Yield: 4 servings 1x
Description
A lighter, crispy oven-baked version of classic chicken parmesan made with juicy chicken cutlets, melted mozzarella, fresh basil, and a golden breadcrumb coating.
Ingredients
- 2 large boneless skinless chicken breasts, sliced into thin cutlets
- 1 cup panko breadcrumbs
- 1/2 cup grated Parmesan cheese
- 1 cup shredded mozzarella cheese
- 1 cup marinara sauce
- 2 large eggs, beaten
- 1/2 cup all-purpose flour
- 1 tablespoon olive oil
- 1 teaspoon Italian seasoning
- 1 teaspoon garlic powder
- 1/2 teaspoon salt
- 1/2 teaspoon black pepper
- Fresh basil for garnish
Instructions
- Preheat oven to 425°F.
- Slice chicken breasts into thin cutlets and pat dry.
- Set up dredging bowls with flour, beaten eggs, and breadcrumb mixture.
- Coat chicken in flour, dip in eggs, then press into breadcrumb mixture.
- Place coated cutlets on a prepared baking sheet and drizzle lightly with olive oil.
- Bake for 15–20 minutes until the coating turns lightly golden.
- Remove tray and spoon marinara over each cutlet, then top with mozzarella.
- Return to oven for 8–10 minutes until cheese melts and bubbles.
- Broil 1–2 minutes for a golden top if desired.
- Garnish with basil and serve immediately.
Notes
- Pat chicken dry before breading for a crispier crust.
- Add sauce and cheese only after the chicken has baked to avoid sogginess.
- Use thin cutlets to ensure even cooking.
- Prep Time: 15 minutes
- Cook Time: 25 minutes
- Category: Main Course
- Method: Baking
- Cuisine: Italian-American
Nutrition
- Serving Size: 1 piece
What Are Our Readers Saying?
There are no reviews yet. Be the first one to write one.