Peanut Butter Chocolate Cheesecake Bars for Sharing, Slicing, and Savoring

Some desserts are saved for special occasions. Others quietly become part of your family rhythm—the kind you make when you want something indulgent but not fussy, impressive but still comforting. These Peanut Butter Chocolate Cheesecake Bars fall right into that second category.
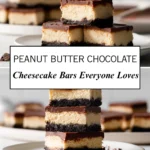
I first started making cheesecake bars instead of full cheesecakes during a season when my fridge was always full and my schedule was tight. I wanted the flavor and creaminess of cheesecake without worrying about water baths, cracked tops, or slicing stress. These bars delivered everything I was craving: a rich Oreo crust, a smooth peanut butter cheesecake center, and a glossy chocolate topping that sets beautifully. They’ve been showing up on our table ever since.
Why These Peanut Butter Chocolate Cheesecake Bars Always Work
What makes these bars so reliable is balance. The peanut butter brings richness without overpowering, the chocolate adds depth, and the cheesecake layer stays creamy rather than dense or dry. Because you’re baking them in a rectangular pan, the heat distributes more evenly than a tall cheesecake, which means fewer surprises when you open the oven door.
There’s also something comforting about bars. They feel casual and generous, like a dessert meant to be shared. You can cut them small for a crowd or into big squares when you want a true treat-yourself moment. And unlike traditional cheesecake, these bars actually improve after a long chill, making them ideal for make-ahead baking.
Ingredients That Matter (And Why They Matter)
Here’s what you’ll need, with a little insight into why each ingredient plays an important role.
Crust
- 30 regular Oreo cookies (with filling)
- 1/2 cup unsalted butter, melted
Peanut Butter Cheesecake Filling
- 24 ounces full-fat cream cheese, softened
- 1 cup granulated sugar
- 1/4 cup sour cream or plain yogurt, room temperature
- 1 cup creamy peanut butter (not natural-style)
- 1 teaspoon vanilla extract
- 1/8 teaspoon salt
- 3 large eggs, room temperature
Chocolate Topping
- 1/2 cup unsalted butter
- 1 heaping cup semi-sweet chocolate chips
The cream cheese and peanut butter are the backbone here. Full-fat cream cheese gives you that silky, classic cheesecake texture, while conventional creamy peanut butter blends smoothly and helps the filling set properly. Natural peanut butter tends to separate and can leave the bars crumbly, so this is one place where the classic option really matters.
Ingredient Substitutions That Actually Work
If you don’t have Oreos, graham cracker crumbs are a fine substitute. The flavor will be lighter and less chocolate-forward, but the bars will still hold together nicely. Sour cream and plain yogurt are interchangeable, as long as they’re full-fat and at room temperature.
When it comes to chocolate, semi-sweet chips strike the right balance. Dark chocolate can work if you prefer less sweetness, but milk chocolate often sets too soft for clean slicing.

Method Overview: Building Clean, Defined Layers
These bars are built in three clear stages: crust, filling, and topping. Each layer has its own job, and taking a little care at each step makes the final result feel bakery-level without extra effort.
You start by pressing a thick, buttery cookie crust into the pan and pre-baking it just long enough to set. The filling comes together in one bowl and pours easily over the warm crust, creating a seamless bond between layers. Finally, the chocolate topping goes on after chilling, giving you that smooth, firm finish that slices beautifully.

Baking, Cooling, and Chilling: Where Most Bars Go Wrong
This is where patience pays off. Cheesecake bars don’t fail because of complicated techniques—they fail when rushed.
As the bars bake, you’re looking for a surface that appears set with lightly browned edges. The center should no longer look wet, but it doesn’t need to be completely firm. A slight jiggle is exactly what you want. Overbaking is the fastest way to lose that creamy texture.
Once the pan comes out of the oven, let it cool at room temperature for about an hour. This gradual cooling helps prevent sinking and keeps the texture smooth. After that, the bars need a long chill in the refrigerator. This step isn’t optional. Chilling allows the cheesecake to fully set and develop its final structure.

Chocolate Topping: Smooth, Set, and Sliceable
The chocolate topping is simple but important. Butter and chocolate melt together into a smooth mixture that firms up just enough to hold its shape without becoming brittle.
Let the melted chocolate cool slightly before spreading it over the chilled bars. If it’s too hot, it can soften the cheesecake layer underneath. Once spread, the topping sets quickly in the fridge, forming a clean, glossy finish that makes slicing a pleasure rather than a struggle.
Texture & Doneness Guide (Trust Your Eyes, Not the Clock)
Oven times are guidelines, but your senses are more reliable. When the bars are ready, the edges will look slightly puffed and lightly golden. The center should feel set when gently touched, with just a little give.
After chilling, the texture transforms. The bars become dense yet creamy, holding clean edges when sliced. If your bars seem too soft, they likely just need more time in the refrigerator. Cheesecake is patient food—it rewards waiting.
Variations Worth Making
Once you’ve made these once, it’s easy to adapt them. Chopped peanut butter cups can be folded into the filling for extra texture. A drizzle of melted chocolate or peanut butter on top adds visual appeal without complicating the recipe.
If you want thicker bars, you can use a smaller pan and slightly extend the bake time. For thinner, more delicate bars, spread the batter evenly in a standard 9×13-inch pan and cut into smaller squares for serving.
Make-Ahead, Storage, and Freezing Tips
These bars are a dream for planning ahead. You can bake and chill them a full day before serving, which actually improves the flavor and texture. Once sliced, they store well in the refrigerator for up to a week when covered.
For longer storage, the bars freeze beautifully. Slice them first, then layer with parchment paper in an airtight container. Thaw overnight in the refrigerator, and they’ll taste just as creamy as the day you made them
Serving Suggestions for Different Occasions
These Peanut Butter Chocolate Cheesecake Bars fit just about anywhere. Serve them straight from the fridge for a clean, polished look, or let them sit at room temperature for a few minutes if you prefer a softer bite.
They’re perfect for potlucks, holidays, bake sales, or quiet evenings when you want a dessert that feels like a reward. A cup of coffee or a cold glass of milk is all you need alongside them.

There’s something deeply satisfying about a dessert you can rely on. These Peanut Butter Chocolate Cheesecake Bars are rich without being overwhelming, indulgent without being complicated, and comforting in the way only a well-loved recipe can be. Once you make them, you’ll understand why they keep finding their way back into the fridge, waiting patiently for the next slice.
FAQ
Can I use natural peanut butter in peanut butter cheesecake bars?
Natural peanut butter isn’t a great fit for this recipe. Because it separates and has less added fat, it can make the cheesecake filling dry or crumbly instead of smooth and creamy. For best results, stick with regular creamy peanut butter.
Why did my cheesecake bars sink in the middle after baking?
A slight dip in the center is completely normal and usually happens as the bars cool. Cheesecake naturally puffs in the oven and settles as it cools, especially with a thick, creamy filling like this one. As long as the center was set and not wet when baked, the texture will be just right after chilling.
How long do cheesecake bars need to chill before slicing?
These bars need at least 3 to 4 hours in the refrigerator to fully set. If you want the cleanest slices, chilling overnight is even better. Cutting too soon is the most common reason for messy or soft bars.
Why is my chocolate topping cracking when I slice the bars?
This usually happens if the chocolate is very cold or set too firmly. Let the bars sit at room temperature for a few minutes before slicing, and use a sharp knife wiped clean between cuts. This helps the chocolate topping stay smooth and crack-free.
Can I freeze peanut butter chocolate cheesecake bars?
Yes, these bars freeze very well. Slice them first, then freeze in a single layer or between sheets of parchment paper. Thaw overnight in the refrigerator, and they’ll taste just as rich and creamy.
Print
Peanut Butter Chocolate Cheesecake Bars
- Total Time: 6 hours 5 minutes
- Yield: 24 bars 1x
- Diet: Vegetarian
Description
Rich and creamy peanut butter chocolate cheesecake bars with an Oreo cookie crust and smooth chocolate topping. Easier than a full cheesecake, perfect for make-ahead desserts and sharing.
Ingredients
- 30 Oreo cookies
- 1/2 cup unsalted butter, melted
- 24 oz full-fat cream cheese, softened
- 1 cup granulated sugar
- 1/4 cup sour cream or plain yogurt
- 1 cup creamy peanut butter
- 1 teaspoon vanilla extract
- 1/8 teaspoon salt
- 3 large eggs
- 1/2 cup unsalted butter (for topping)
- 1 heaping cup semi-sweet chocolate chips
Instructions
- Preheat the oven to 350°F and line a 9×13-inch pan with parchment paper.
- Crush the Oreo cookies into fine crumbs and mix with melted butter.
- Press the crust firmly into the prepared pan and pre-bake for 10 minutes.
- Beat cream cheese and sugar until smooth, then mix in sour cream, peanut butter, vanilla, and salt.
- Add eggs one at a time, mixing just until combined.
- Spread the cheesecake filling evenly over the warm crust.
- Bake for 35 to 38 minutes until the center is set and edges are lightly browned.
- Cool at room temperature for 1 hour, then refrigerate for at least 3 hours.
- Melt butter and chocolate chips together until smooth.
- Spread chocolate topping over chilled bars and refrigerate until set before slicing.
Notes
- Do not use natural peanut butter as it may cause the filling to be dry or crumbly.
- Chill the bars fully before slicing for clean edges.
- Bars can be made a day ahead and improve in texture after chilling.
- Freeze sliced bars for up to 3 months and thaw overnight in the refrigerator.
- Prep Time: 30 minutes
- Cook Time: 36 minutes
- Category: Dessert
- Method: Baking
- Cuisine: American
Nutrition
- Serving Size: 1 bar
- Calories: 360
- Sugar: 27 g
- Sodium: 220 mg
- Fat: 25 g
- Saturated Fat: 14 g
- Unsaturated Fat: 9 g
- Trans Fat: 0 g
- Carbohydrates: 32 g
- Fiber: 2 g
- Protein: 7 g
- Cholesterol: 85 mg