No-Bake Oreo Cheesecake That Feels Like a Hug in Every Bite

There’s something quietly relaxing about a dessert that doesn’t ask much from you. No oven to preheat. No timers ringing in the background. Just a bowl, a spoon, and a little patience while everything chills into something wonderful. That’s exactly what this No Bake Oreo Cheesecake is — the kind of dessert you make when you want something indulgent but easy, familiar but still special.
This is the cheesecake I reach for when the house feels busy, when company is coming, or when I simply want something sweet waiting in the fridge at the end of the day. It’s creamy, light, loaded with Oreo flavor, and always disappears faster than you expect.
Why This No-Bake Oreo Cheesecake Works Every Time
This recipe succeeds because it relies on balance instead of complication. The Oreo crust gives you structure without being heavy. The filling stays light because of whipped cream, but it still holds its shape thanks to full-fat cream cheese and the right chilling time.
There’s no baking stress, no worrying about cracks or water baths. Instead, you rely on texture cues — smooth, fluffy, and just firm enough to slice cleanly. Once you make it once, it becomes one of those dependable desserts you can throw together almost on autopilot.
Ingredients That Make the Difference
Here’s what you’ll need to bring everything together. Each ingredient plays a specific role, so small substitutions can change the final texture.
For the crust
- 3 cups Oreo crumbs (about 35 cookies)
- 5 tablespoons unsalted butter, melted
For the filling
- 24 ounces full-fat cream cheese, softened to room temperature
- 1/2 cup granulated sugar
- 2 tablespoons vanilla extract
- 1 1/4 cups cold heavy whipping cream
- 3/4 cup powdered sugar
- 1 1/2 cups Oreo crumbs
- 7–10 Oreos, roughly chopped
For the whipped cream topping
- 3/4 cup cold heavy whipping cream
- 6 tablespoons powdered sugar
- 1/2 teaspoon pure vanilla extract
- Extra Oreo crumbs or halved cookies for garnish
Full-fat ingredients matter here. Low-fat substitutions tend to soften too much and won’t hold a clean slice.

Tools and Setup That Make Things Easier
A 9-inch springform pan is ideal for this recipe. It allows you to release the cheesecake cleanly without flipping or cutting it out. Lining the bottom with parchment paper helps even more when it’s time to transfer.
You’ll also want a hand mixer or stand mixer for smooth results. A sturdy spatula helps when folding everything together gently without deflating the filling.
Before you start, clear a space in your fridge so the cheesecake can chill undisturbed for several hours.
Building the Perfect Oreo Crust
Start by combining the Oreo crumbs and melted butter until everything looks evenly coated and slightly damp. When you press a bit between your fingers, it should hold together without feeling greasy.
Press the mixture firmly into the bottom of the pan and slightly up the sides. Use the bottom of a measuring cup or glass to compact it evenly. This helps the crust hold its shape once sliced.
Set the crust in the refrigerator while you prepare the filling. That short chill helps it firm up and keeps it from mixing into the filling later.

The Creamy Filling That Makes This Cheesecake Shine
Beating and Blending with Care
In a large bowl, whisk the softened cream cheese until it’s smooth and free of lumps. This step is easier when the cream cheese is fully at room temperature, so don’t rush it. Add the granulated sugar and vanilla, then beat again until silky and cohesive.
In a separate bowl, whip the cold heavy cream with the powdered sugar until stiff peaks form. You’re looking for structure, not stiffness that looks dry or grainy.
Gently fold the whipped cream into the cream cheese mixture in two additions. Use a light hand and slow strokes. This makes the filling airy instead of dense.
Folding in the Oreos
Once the base is smooth, fold in the Oreo crumbs and chopped cookies. The crumbs add flavor throughout, while the chunks give little pockets of crunch in every slice.
Spoon the filling over the chilled crust and smooth the top. At this stage, it should already look like something you’d want to sneak a bite of.

Chilling, Setting, and Knowing When It’s Ready
Cover the cheesecake and refrigerate it for at least 5 to 6 hours, though overnight is even better. The chilling time allows the filling to firm up and the flavors to deepen.
You’ll know it’s prepared when the center feels set to the touch and doesn’t wobble when you gently move the pan. A clean slice should hold its shape without collapsing.
If you try to rush this step, the texture won’t fully set, so patience really pays off here.
Topping and Presentation
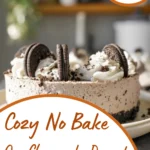
When you’re ready to serve, whip the topping ingredients together until soft, fluffy peaks form. Spread or pipe the whipped cream around the edges of the cheesecake for a bakery-style finish.
Garnish with Oreo halves or a light dusting of crumbs. This adds contrast and makes the dessert look just as good as it tastes.
Flavor Variations That Still Feel Familiar
If you want to change things up without losing the spirit of the recipe, there are a few easy ways to do it.
A drizzle of chocolate ganache over the top adds richness without drowning out the cheesecake. For a minty twist, swap regular Oreos for mint-flavored ones. You can also fold in mini chocolate chips or swirl in a little melted chocolate before chilling.
For individual servings, this recipe works beautifully in jars or small glasses — perfect for parties or make-ahead treats.

Make-Ahead, Storage, and Freezing Tips
This cheesecake is ideal for making ahead. You can prepare it up to two days in advance and keep it covered in the refrigerator.
Leftovers keep well for about four to five days when stored airtight. If you want to freeze it, freeze the cheesecake without the whipped topping. Wrap it tightly and freeze for up to two months. Thaw overnight in the fridge before decorating and serving.
Avoid freezing once toppings are added, as they can weep and lose their texture.
A Dessert That Feels Like Home
This No-Bake Oreo Cheesecake is one of those recipes that always seems to be part of your kitchen, even the first time you make it. It’s easy without feeling lazy, indulgent without being heavy, and comforting in that familiar, nostalgic way only Oreos can be.
Whether you’re making it for a celebration or just because the day called for something sweet, it’s the kind of dessert that brings people back for one more slice — and maybe a second one after that.
FAQ
Can I make this No-Bake Oreo Cheesecake ahead of time?
Yes, and it actually works better that way. Making it a day ahead gives the cheesecake plenty of time to fully set and lets the flavors come together. Just keep it covered in the refrigerator until you’re ready to serve.
Why didn’t my no-bake cheesecake set properly?
This usually happens if the cream wasn’t whipped to stiff peaks or if the cheesecake didn’t chill long enough. Make sure your heavy cream is very cold before whipping, and give the cheesecake at least 5 to 6 hours in the fridge, or overnight for best results.
Can I freeze no-bake Oreo cheesecake?
Yes, you can freeze it, preferably without the whipped cream topping. Wrap it tightly and freeze for up to two months. Thaw it overnight in the refrigerator, then add the topping before serving for the best texture.
Can I use low-fat cream cheese or whipped topping?
Low-fat cream cheese tends to make the filling softer and less stable, so full-fat works best. Whipped topping can be used in a pinch, but the texture will be lighter and less rich than using real whipped cream.
How do I get clean slices when serving?
For clean slices, use a sharp knife and wipe it clean between cuts. Chilling the cheesecake thoroughly and cutting it straight from the fridge also helps keep the edges neat.
Print
No Bake Oreo Cheesecake
- Total Time: 5 hours 45 minutes
- Yield: 12 servings 1x
- Diet: Vegetarian
Description
This No-Bake Oreo Cheesecake is rich, creamy, and easy to make with a crunchy Oreo crust and smooth cookies-and-cream filling. It’s a pleasant make-ahead dessert that’s excellent for gatherings or relaxed family nights.
Ingredients
- 3 cups Oreo crumbs
- 5 tablespoons unsalted butter, melted
- 24 ounces cream cheese, softened
- 1/2 cup granulated sugar
- 2 tablespoons vanilla extract
- 1 1/4 cups heavy whipping cream
- 3/4 cup powdered sugar
- 1 1/2 cups Oreo crumbs
- 7 to 10 Oreo cookies, chopped
- 3/4 cup heavy whipping cream (for topping)
- 6 tablespoons powdered sugar (for topping)
- 1/2 teaspoon pure vanilla extract (for topping)
- Extra Oreo crumbs or halves for garnish
Instructions
- Line a 9-inch springform pan with parchment paper and lightly grease the sides.
- Mix Oreo crumbs with melted butter until evenly combined and press firmly into the pan to form the crust.
- Whip the softened cream cheese with granulated sugar and vanilla until smooth and creamy.
- In a separate bowl, whip the heavy cream and powdered sugar until stiff peaks form.
- Gently fold the whipped cream into the cream cheese mixture until fully combined.
- Fold in the Oreo crumbs and chopped cookies until evenly distributed.
- Spread the filling over the crust and smooth the top.
- Refrigerate for at least 5 to 6 hours, or until fully set.
- Whip topping ingredients until fluffy and decorate the cheesecake just before serving.
Notes
- Use full-fat cream cheese for the best texture.
- Chill overnight for the cleanest slices.
- Freeze without topping if making ahead for longer storage.
- Prep Time: 45 minutes
- Cook Time: 0 minutes
- Category: Dessert
- Method: No Bake
- Cuisine: American
Nutrition
- Serving Size: 1 slice
- Calories: 420
- Sugar: 28 g
- Sodium: 320 mg
- Fat: 30 g
- Saturated Fat: 17 g
- Unsaturated Fat: 11 g
- Trans Fat: 0 g
- Carbohydrates: 36 g
- Fiber: 1 g
- Protein: 6 g
- Cholesterol: 95 mg