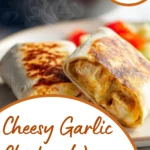
Cheesy Garlic Chicken Wraps That Feel Like a Go-To Comfort Lunch

Some days you want a meal that feels warm and satisfying without turning the kitchen upside down. The kind of food you can make between meetings, after school pickup, or on a quiet evening when you just want something good and familiar. That’s exactly where Cheesy Garlic Chicken Wraps come in. They’re crisp on the outside, melty and garlicky inside, and made with ingredients you probably already have waiting in the fridge.
This is the kind of recipe you make once, then keep coming back to. Not because it’s trendy, but because it works. Every single time.
Why This Wrap Works Every Single Time
There’s something comforting about taking leftover chicken and turning it into something that feels brand new. You’re not starting from scratch, and you’re not overthinking it either. The garlic goes straight into a creamy sauce so it mellows instead of burning. The cheese is layered where it can actually melt and hold everything together. And the tortilla crisps up in a hot pan until it’s golden and irresistible.
What makes these wraps special isn’t one fancy ingredient. It’s the balance. Creamy without being heavy. Garlicky without overpowering. Crispy on the outside, soft and savory inside. It’s the kind of balance you learn from cooking at home, not from following rigid rules.
Ingredients That Matter (And Where You Can Flex)
Here’s what you’ll need to make these wraps, along with a little guidance so you can adjust confidently if needed.
- 2 large flour tortillas
- 7 ounces cooked chicken, chopped
- 2 garlic cloves, minced or finely grated
- 2 tablespoons light mayonnaise
- 1 tablespoon plain Greek yogurt
- 2 teaspoons hot sauce, such as Frank’s
- 1/4 teaspoon kosher salt
- 3 ounces shredded cheese (cheddar or a cheddar blend works well)
- 1 green onion, finely chopped
- Olive oil spray
Cooked chicken is where this recipe shines. Rotisserie chicken is perfect, but leftover grilled or roasted chicken works just as well. If your chicken is already well seasoned, just keep that in mind when adding salt.
Garlic can be adjusted based on taste. Grated garlic blends smoothly into the sauce and gives a softer, more even flavor, while minced garlic adds little bursts of intensity. Both work.
As for cheese, choose something that melts easily. Sharp cheddar adds flavor, while blends melt smoothly and help everything hold together.

The Method, Explained Like a Real Cook Would
Building the Filling for Flavor, Not Just Mixing
You start by making the filling, and this step sets the tone for the whole wrap. In a bowl, combine the chopped chicken, garlic, mayonnaise, yogurt, hot sauce, and salt. Stir until everything is evenly coated. You want the chicken to look glossy, not dry or clumpy.
Take a moment to taste the mixture. This is where you adjust. A little more hot sauce if you like heat. A pinch more salt if the chicken was plain. Once it tastes good on its own, you’re in great shape.

Wrapping for a Tight Roll and Even Cooking
Lay one tortilla flat on the counter. On the lower third, sprinkle a small layer of shredded cheese first. This helps create a barrier and keeps the tortilla from getting soggy.
Spoon the chicken mixture on top, spreading it evenly without overfilling. Finish with another light sprinkle of cheese and a few pieces of green onion. Fold the sides of the tortilla inward, then roll it up tightly from the bottom, keeping everything snug as you go.
A tight wrap means even cooking and fewer leaks in the pan.

Timing, Heat, and Doneness (Where Most Wraps Go Wrong)
Heat a nonstick skillet over medium-high heat and lightly spray it with olive oil. Place the wraps seam-side down in the pan. You should hear a gentle sizzle, not an aggressive crackle. That sound tells you the heat is right.
Let the wraps cook undisturbed for about three to four minutes per side. When they’re ready to flip, the bottom will be golden and crisp, releasing easily from the pan. After flipping, loosely cover the skillet with a lid. This traps heat and helps the cheese melt fully without burning the outside.
You’ll know they’re done when the tortillas are evenly golden and the wraps feel soft and warm through the center when pressed gently.
Texture Troubleshooting & Common Mistakes
If your wrap turns soggy, the pan likely wasn’t hot enough or the cheese wasn’t layered properly. Starting with cheese against the tortilla makes a big difference.
Overfilling is another common issue. It’s tempting, but too much filling prevents crisping and makes flipping difficult. A moderate amount cooks better and tastes more balanced.
If the chicken feels dry, it usually means the sauce ratio was off. The mayonnaise and yogurt are there to protect the meat as it reheats. Make sure everything is well coated before wrapping.
Cheese not melting? Covering the pan for the last minute or two almost always fixes that.
Easy Variations That Still Feel Like the Same Recipe
Once you’ve made these once, you’ll start imagining all the ways to tweak them. You can add extra heat with crushed red pepper or a spicier hot sauce. Roasted garlic adds a deeper, sweeter flavor if you have it on hand.
For a veggie boost, finely chopped bell peppers or spinach work well, as long as they’re not too wet. The filling also makes great quesadillas, grilled sandwiches, or even a topping for baked potatoes when you want something different.
Dietary Variations That Actually Make Sense
If you’re looking to lighten things up, high-protein or low-carb tortillas work well here. Just know they may crisp slightly differently, so adjust the heat as needed.
Reducing the cheese is possible, but keep a little in both layers so the wrap still holds together. For a halal-friendly version, simply use halal-certified chicken and sauces.
Gluten-free tortillas can be used, but handle them gently and warm them slightly before rolling to prevent cracking.
Make-Ahead, Storage, and Reheating Without Losing the Crisp
The chicken filling can be made up to three days ahead and stored in the refrigerator. When you’re ready to eat, just assemble and cook the wraps fresh.
Cooked wraps keep well in the fridge for up to two days. Reheat them in a skillet or air fryer to bring back the crisp exterior. The microwave will warm them, but you’ll lose that crunch.
Freezing the filling works well for up to one month, but freezing fully assembled wraps isn’t recommended.
How to Serve These Wraps Like a Full Meal
These wraps are filling on their own, but they pair beautifully with a crisp green salad, roasted vegetables, or even a few pickles on the side. A little salsa or yogurt-based dip adds freshness, and if you’re feeling indulgent, a handful of chips never hurts.
They’re perfect for lunch, easy dinners, or those nights when everyone eats at different times and you need something reliable.
There’s something deeply comforting about a recipe you can trust. These Cheesy Garlic Chicken Wraps are warm, satisfying, and forgiving, just like the best home cooking should be. Once you make them, they tend to find their way back into the weekly rotation, not because they’re flashy, but because they feel right every time you make them.

FAQ
Can I bake these cheesy garlic chicken wraps instead of pan-frying?
Yes, you can bake them if that’s easier. Place the wraps seam-side down on a lined baking sheet and bake at 400°F for about 10–12 minutes, flipping once halfway through. They’ll be hot and melty inside, though the stovetop or air fryer gives a slightly crispier finish.
Can I make cheesy garlic chicken wraps in the air fryer?
Absolutely, the air fryer works very well for this recipe. Cook the wraps at 375°F for about 6–8 minutes, turning once, until they’re golden and crisp. Keep an eye on them toward the end since air fryers can vary in strength.
Why is my wrap not getting crispy?
This usually happens when the pan isn’t hot enough or there’s too much filling inside the tortilla. Make sure your skillet is fully heated before adding the wraps, and avoid overstuffing so the tortilla can make good contact with the pan. A light spray of oil also helps with browning.
Can I prepare the filling ahead of time?
Yes, the chicken filling can be made ahead and stored in the refrigerator for up to three days. When you’re ready to eat, simply assemble the wraps and cook them fresh so the tortillas stay crisp and the cheese melts properly.
Print
Cheesy Garlic Chicken Wraps
- Total Time: 22 minutes
- Yield: 2 servings 1x
Description
Crispy on the outside and melty inside, these cheesy garlic chicken wraps are an easy, comforting meal made with leftover chicken, creamy garlic sauce, and melted cheese. Perfect for a quick lunch or simple dinner.
Ingredients
- 2 large flour tortillas
- 7 oz cooked chicken, chopped
- 2 garlic cloves, minced or grated
- 2 tablespoons light mayonnaise
- 1 tablespoon plain Greek yogurt
- 2 teaspoons hot sauce
- 1/4 teaspoon kosher salt
- 3 oz shredded cheddar or cheddar blend cheese
- 1 green onion, chopped
- Olive oil spray
Instructions
- In a bowl, mix the chopped chicken with garlic, mayonnaise, yogurt, hot sauce, and salt until evenly coated.
- Lay a tortilla flat and sprinkle a small layer of cheese on the lower third of the wrap.
- Add the chicken mixture evenly over the cheese, then top with a little more cheese and green onion.
- Fold in the sides of the tortilla and roll it up tightly from the bottom.
- Heat a nonstick skillet over medium-high heat and lightly spray with olive oil.
- Place the wraps seam-side down in the pan and cook for 3 to 4 minutes per side until golden and crisp, covering briefly to melt the cheese.
- Remove from the pan, slice in half, and serve warm.
Notes
- Covering the pan helps the cheese melt evenly without burning the tortilla.
- The chicken filling can be made ahead and stored in the refrigerator for up to 3 days.
- Air fryer option: cook at 375°F for 6 to 8 minutes, turning once.
- Baking option: bake at 400°F for 10 to 12 minutes, flipping halfway through.
- Store cooked wraps in the refrigerator for up to 2 days and reheat in a skillet or air fryer for best texture.
- Prep Time: 15 minutes
- Cook Time: 7 minutes
- Category: Lunch
- Method: Skillet
- Cuisine: American
Nutrition
- Serving Size: 1 wrap
- Calories: 476
- Sugar: 2
- Sodium: 1090
- Fat: 27
- Saturated Fat: 11
- Unsaturated Fat: 12
- Trans Fat: 0.01
- Carbohydrates: 19
- Fiber: 1
- Protein: 38
- Cholesterol: 120