Walnut Tart: A Cozy Maple-Honey Dessert With the Perfect Crunch

The first time I baked this walnut tart, I pulled it out of the oven too early. The edges looked perfect—golden crust, toasted nuts peeking through the surface—but the center still moved like warm caramel. I assumed I had ruined it. Twenty minutes later, once it cooled on the rack by the open kitchen window, that soft center settled into the most incredible texture—silky, slightly sticky, and packed with the deep aroma of maple syrup and roasted walnuts. It turned out the “mistake” was actually the secret.
There’s something quietly comforting about a tart like this. The crust is thin and buttery, just sturdy enough to hold a filling that tastes like maple candy and toasted nuts melted together. The walnuts bake into the custard, releasing their oils and turning fragrant in the oven, while the honey and maple syrup give the filling a warm sweetness that doesn’t feel heavy. I learned pretty quickly that the key is balance—too much baking and the filling firms up too much, too little and it never sets properly.
This walnut tart is the kind of dessert that feels right at almost any time of year. It’s cozy enough for a chilly fall evening, but simple enough to bake when friends are coming over and you want something homemade that doesn’t require complicated pastry tricks. Once you understand a couple of small techniques—the thin crust, the chilled shell, and the right moment to pull it from the oven—the whole thing comes together surprisingly easily.
Why Maple Syrup, Honey, and Toasted Walnuts Work Like a Team
The heart of this walnut tart is the balance between sweetness, nuttiness, and texture. A lot of nut tarts end up tasting flat because they rely on sugar alone. Here, the sweetness is layered. Maple syrup brings depth and that slightly smoky caramel note that works beautifully with roasted nuts. Honey adds body and helps the filling bake into a creamy custard instead of a sugary paste. Then the walnuts step in with their natural bitterness and crunch, which keeps the whole dessert from feeling overly sweet.
The crust plays an important supporting role, too. A traditional shortcrust made with butter gives the tart structure, but the addition of nut flour (hazelnut flour works especially well) quietly reinforces the flavor of the filling. It’s subtle, but it’s the kind of detail that makes a tart taste as if it came from a pastry shop instead of a boxed mix.
This combination is also why the recipe works in every season. The ingredients are pantry-friendly, and the flavors lean warm and comforting without being heavy.

- All-purpose flour: Keeps the crust tender but stable. Bread flour would make the crust tougher than we want for a tart shell.
- Butter (82–83% fat): The higher fat content gives the dough its crumbly shortbread texture. European-style butter works especially well here.
- Powdered sugar: Helps create a delicate crust texture compared to granulated sugar.
- Nut flour (hazelnut recommended): Adds aroma and prevents the crust from tasting bland.
- Eggs: Bind the crust and the filling. Use large eggs for consistent texture.
- Walnuts: The star of the tart. Always toast them lightly before mixing them in to deepen the flavor.
- Maple syrup: Provides richness and that signature warm flavor. Thin pancake syrup will not give the same depth.
- Honey: Adds viscosity and balances the maple notes with a softer floral sweetness.
- Granulated or brown sugar: Brown sugar is ideal because it reinforces the nutty flavors.
- Melted butter: Brings the filling together and creates the silky custard-like texture during baking.
If you only have salted butter, simply skip any extra pinch of salt in the crust. And if maple syrup isn’t available, a thick syrup like corn syrup or date syrup can work in a pinch, though the flavor will shift slightly.
How One Tart Recipe Works in Every Season
One reason I keep coming back to this walnut tart is that the structure of the recipe is incredibly forgiving. The base formula—shortcrust shell plus maple-honey nut filling—stays the same, but the nuts themselves can change depending on what you have or what’s in season.
Walnuts give the tart a deeper, slightly earthy flavor, which is why they work so well here. But the method doesn’t depend on them alone. Pecans make the filling sweeter and more buttery, hazelnuts add roasted complexity, and pistachios give the tart a lighter flavor with a beautiful green contrast.
The real rule isn’t which nuts you use. The rule is roasting them first. Raw nuts taste flat once baked into the filling, while toasted nuts release oils that make the entire tart smell incredible as it bakes.
Another small but important concept behind this walnut tart is preparation. The tart shell can be made ahead and frozen for up to a few weeks. That means when guests are coming over, you’re really only mixing the filling and sliding the tart into the oven. It’s the kind of quiet kitchen trick that turns a “special occasion” dessert into something you can realistically bake on a regular weeknight.
The Quiet Trick That Keeps the Tart Shell Perfect
The crust for this walnut tart is a classic shortcrust, but the way you handle it makes all the difference. Once the dough has rested in the refrigerator for at least 40 minutes, roll it out between two sheets of parchment paper. This keeps the dough from sticking and helps maintain an even thickness—about 2 mm is ideal. Thin enough to stay delicate, but sturdy enough to hold the filling.

When you transfer the dough into the tart ring, press it carefully into the corner where the bottom meets the sides. That little corner is where most tart shells fail. If the dough isn’t snug there, the crust can collapse or bake unevenly. Run your finger gently along the sides and trim the excess dough using the ring as your guide.
Before freezing the shell, prick the bottom with a fork across the entire surface. This prevents trapped steam from puffing the base. Then place the prepared shell in the freezer for about 30 minutes.
Reality check: if the dough starts feeling soft or greasy while you’re working with it, stop and chill it again. Warm dough shrinks dramatically in the oven, and no amount of careful shaping can save it once the butter melts too early.
Mixing the Filling in the Simplest Way Possible
The filling for this walnut tart is surprisingly straightforward. Place your mixing bowl on a kitchen scale and begin adding ingredients directly into it. Dry ingredients go in first, followed by honey, maple syrup, and melted butter. The mixture will start to smell warm and sweet almost immediately, especially once the maple syrup hits the bowl.
Crack in the eggs last and mix everything with a mixer until the filling turns smooth and glossy. You’re aiming for a texture that resembles thick caramel cream. Once that base is fully blended, fold in the toasted walnuts using a spatula.
If the mixture looks slightly separated or oily at first, don’t worry. That usually just means the ingredients weren’t fully incorporated yet. Keep mixing until the filling becomes uniform and silky.
The Exact Baking Moment That Determines the Texture
Preheat the oven to about 170°C (340°F) using top-and-bottom heat. Only take the frozen tart shell out of the freezer once the oven is fully heated. Pour the filling gently into the shell—using a ladle helps keep the edges clean.

As the tart bakes, the smell of maple syrup and toasted walnuts will start filling the kitchen. The filling may rise slightly as it cooks, almost like it’s breathing. That’s completely normal, and it will settle back down as it cools.
The tart is ready when the edges look set, and the center barely trembles when you gently shake the pan. This is the key moment for the texture of the walnut tart. Overbake i,t and the filling turns firm and dense instead of silky.
Once baked, place the tart on a cooling rack and let it cool completely before removing it from the pan.
Reality check: the filling and crust are both fragile while warm. If you try to remove the tart too early, the crust can crack, and the center may slump. Patience here is the difference between a rustic dessert and a bakery-style tart.
How One Tart Recipe Works in Every Season
One of the things I appreciate most about this walnut tart is how forgiving it is when it comes to the nuts themselves. Walnuts give the tart its signature earthy flavor, but the structure of the filling works just as well with other toasted nuts if that’s what you have in the pantry.
Pecans are probably the closest substitute. They’re sweeter and slightly softer once baked, which pairs beautifully with maple syrup. Hazelnuts are another excellent option—they bring a deeper roasted aroma that works especially well if youhave already used hazelnut flour in the crust. Pistachios create a lighter, almost buttery flavor and give the tart a beautiful color contrast.
Mixing nuts can also make the tart more interesting. A combination of walnuts and pecans creates layers of flavor and texture, especially when the pieces vary slightly in size. Just make sure whatever nuts you choose are lightly roasted first. Raw nuts tend to taste dull once baked into the filling.
If maple syrup is difficult to find, you can substitute a thick syrup like corn syrup or date syrup. The tart will still set properly, though the flavor will lean a little more toward caramel than maple. What I wouldn’t recommend skipping is the honey entirely—the small amount in the filling helps create that smooth, custard-like texture.
When This Tart Makes the Most Sense to Serve
This walnut tart is the kind of dessert that quietly steals the show after a simple meal. Because the filling is rich and nutty, it works best when served after something savory but not overly heavy. A roast chicken dinner, a simple Sunday pot roast, or even a bowl of vegetable soup makes a perfect lead-in.
Serve the tart slightly cool or at room temperature so the filling has fully set. When you slice into it, the crust should stay crisp while the center remains soft and creamy. A small spoonful of lightly whipped cream or a scoop of vanilla ice cream melts into the warm maple notes and balances the richness of the nuts.

For drinks, strong coffee or black tea cuts through the sweetness nicely. If you’re serving this walnut tart at a gathering, a small glass of bourbon or dark rum alongside the slice pairs surprisingly well with the toasted walnut and maple flavors.
The Small Details That Make the Tart Look Bakery-Level
A few small details can make a homemade tart look surprisingly professional. After baking, sprinkle a small handful of fresh walnuts on top while the tart is still warm. The contrast between the baked nuts pressed into the filling and the fresh nuts on top adds texture and visual depth.
Another detail is slicing. Use a thin, sharp knife and wipe the blade clean between cuts. Because the filling is soft and custard-like, a clean blade prevents the slices from dragging and breaking the edges.
And if the surface of your tart cracks slightly as it cools, don’t worry. That happens sometimes as the filling settles. A light dusting of powdered sugar or a few extra walnut pieces on top will make it look intentional rather than accidental.
This walnut tart is exactly the kind of dessert that reminds me why I started cooking in the first place. It’s simple, comforting, and made from ingredients most of us already have at home. Once you bake it a couple of times and learn the rhythm of the crust and filling, it becomes the sort of recipe you can pull out anytime you want something warm, familiar, and just a little bit special for the table.
FAQ
Why is the center of my walnut tart still slightly jiggly after baking?
That gentle wobble in the center is actually what you want. The filling continues to set as the tart cools, turning into that soft, custard-like texture. If you bake it until the center is completely firm in the oven, the finished walnut tart can end up dense instead of silky.
Can I make a walnut tart ahead of time?
Yes, and it actually works very well for that. The tart shell can be prepared and frozen for up to a few weeks, which makes last-minute baking much easier. Once baked, the tart also holds its texture well for a day or two if stored in the refrigerator.
Do walnuts need to be toasted before baking the tart?
Toasting the walnuts first makes a big difference in flavor. It deepens their natural oils and gives the tart a richer, more aromatic taste as it bakes. Raw walnuts will still work, but the filling won’t develop the same warm, nutty depth.
What can I use instead of maple syrup in the walnut tart filling?
If maple syrup isn’t available, a thick syrup such as corn syrup or date syrup can work as a substitute. The filling will still set properly, though the flavor will lean more toward caramel than maple. Try to use a syrup that has both sweetness and some body so the texture stays smooth.
Why did my tart crust shrink during baking?
Crust shrinkage usually happens when the dough wasn’t chilled long enough before baking. Freezing the shaped tart shell for about 30 minutes helps the butter stay solid when it hits the oven, which keeps the sides from sliding down. Working with dough that’s too warm can also cause the same problem.
Print
Walnut Tart
- Total Time: 1 hour 15 minutes
- Yield: 8 servings 1x
- Diet: Vegetarian
Description
A cozy walnut tart with maple syrup, honey, and toasted walnuts baked in a buttery shortcrust shell. Rich, nutty, and perfect for homemade dessert lovers.
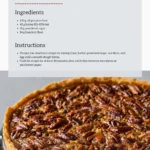
Ingredients
- 100 g all-purpose flour
- 45 g butter (82–83% fat)
- 25 g powdered sugar
- 14 g hazelnut flour
- 1 egg
- 40 g butter for filling
- 50 g sugar
- 25 g flour
- 25 g nut flour
- 190 g honey
- 115 g maple syrup
- 3–4 eggs
- 220 g toasted walnuts
Instructions
- Prepare the shortcrust dough by mixing flour, butter, powdered sugar, nut flour, and egg until a smooth dough forms.
- Chill the dough for at least 40 minutes, then roll it thin between two sheets of parchment paper.
- Place the rolled dough into a tart ring and press gently into the edges to form the crust.
- Trim excess dough and prick the bottom with a fork to prevent bubbling.
- Freeze the tart shell for about 30 minutes before baking.
- Prepare the filling by mixing sugar, flour, nut flour, honey, maple syrup, and melted butter in a bowl.
- Add the eggs and mix until the mixture becomes smooth and glossy.
- Fold in the toasted walnuts using a spatula.
- Preheat oven to 170°C (340°F) and remove the frozen shell from the freezer.
- Pour the filling into the shell and bake for 35–55 minutes until the edges are set and the center slightly jiggles.
- Allow the tart to cool completely before removing from the pan and slicing.
Notes
- Toast the walnuts lightly before adding them to enhance their flavor.
- Freeze the tart shell before baking to prevent the crust from shrinking.
- The filling should still slightly wobble when the tart comes out of the oven.
- Allow the tart to cool fully before slicing so the filling sets properly.
- Prep Time: 30 minutes
- Cook Time: 45 minutes
- Category: Dessert
- Method: Baking
- Cuisine: American
Nutrition
- Serving Size: 1 slice
- Calories: 420
- Sugar: 28
- Sodium: 110
- Fat: 24
- Saturated Fat: 9
- Unsaturated Fat: 13
- Trans Fat: 0
- Carbohydrates: 45
- Fiber: 2
- Protein: 6
- Cholesterol: 95