Wild Huckleberry Pie That Tastes Like Summer at Home

There’s something about baking a pie that slows the day down. Maybe it’s the sound of berries hitting the bowl, or the way the kitchen starts to smell sweet before the oven even finishes preheating. For me, wild huckleberry pie has always been one of those desserts that feels like a reward for paying attention. You don’t rush it. You let it rest. And when you finally cut that first slice, it tastes like summer decided to stay a little longer.
This is the kind of pie you make when you want something classic but special. Huckleberries have a tart, almost wine-like flavor that’s deeper than blueberries, and when they bake down into a thick, glossy filling, they don’t need much help. Just the right balance of sugar, a touch of citrus, and a crust that turns golden and flaky in a real home oven.
Why This Wild Huckleberry Pie Works
Huckleberries behave differently than most berries, and that’s where a lot of recipes go wrong. They’re smaller, juicier, and more tart, which means they can easily turn a pie into soup if you don’t respect them. This recipe works because it leans into those traits instead of fighting them.
The combination of white and brown sugar softens the sharpness without covering up the berry flavor. A little orange zest and juice brightens everything, but you’d never guess citrus was involved unless someone told you. The biggest secret, though, is patience. Letting the filling rest before baking gives the tapioca time to activate, which means the pie sets beautifully once it cools.
Ingredients That Matter (And Why)
Here’s what you’ll need. Each ingredient has a job, and none of them are just along for the ride.
- 1 box refrigerated pie crusts (2 crusts total)
- 4 cups wild huckleberries (use 5 cups if skipping the apple)
- ½ cup granulated sugar
- ½ cup brown sugar
- ¼ cup quick-cooking tapioca (for fruit pies)
- 1½ teaspoons orange zest or orange powder
- 1 tablespoon orange juice
- ¼ teaspoon salt
- 1 tablespoon butter, cut into small pieces
- 1 tablespoon milk (or egg wash, if preferred)
- 2 teaspoons sugar, for sprinkling on the crust
The optional ingredient is one small apple, finely shredded. You won’t taste it in the finished pie, but it adds natural pectin and helps thicken the filling if your berries are especially juicy.

Choosing the Right Crust Approach
Lattice, Full Top, or Crumb
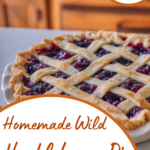
A lattice top is classic for wild huckleberry pie, and it’s not just for looks. Those open spaces let steam escape, which helps the filling thicken instead of bubbling over. If lattice feels intimidating, remember it doesn’t need to be perfect. A slightly uneven weave still bakes up beautifully.
A full top crust works just as well. If you go that route, be sure to cut generous vents so the filling can breathe. There’s also a crumb topping option if you prefer a softer bite and less crust work. That version is especially nice when serving the pie warm.
Store-Bought vs. Homemade Crust
There’s no shame in using refrigerated crusts here. They’re reliable, consistent, and perfect for a busy kitchen. What matters most is keeping the dough cold until you’re ready to use it. Cold dough equals flaky layers. If you enjoy making crust from scratch, this filling pairs wonderfully with a buttery homemade crust, but the pie doesn’t depend on it.
Method Overview: What to Focus On
Start by preheating your oven to 375°F and lining a 9-inch pie plate with one of the crusts. Let the excess hang over the edge for now. In a large bowl, combine both sugars, the tapioca, orange zest, orange juice, and salt. Stir everything together before adding the berries so the tapioca coats evenly.
Gently fold in the huckleberries and the shredded apple, if using. Take your time here. You want the berries intact, not crushed. Once everything is mixed, let the filling sit for about 15 minutes. This rest is crucial. You’ll notice the mixture thickening slightly as the tapioca starts doing its job.

While the filling rests, roll out the second crust and cut it into strips if you’re making a lattice. Quarter-inch strips are forgiving and easy to work with. Pour the rested filling into the prepared crust, scraping every bit of juice into the pan. Dot the top with butter, then arrange your lattice or top crust. Tuck or crimp the edges in a way that feels comfortable to you.
Brush the crust lightly with milk and sprinkle with sugar. Cover the edges with foil or a crust shield to prevent over-browning, and slide the pie into the oven.
Timing, Doneness, and Texture Cues
This pie needs about an hour in the oven, but the clock isn’t the best judge here. What you’re really watching for is the filling. About 45 minutes in, you should see thick bubbles rising through the lattice openings. They should look slow and glossy, not thin and watery.

During the last 15 minutes, remove the foil from the edges so the crust can finish browning. The top should be golden, not pale, and the pie should smell deeply fruity with a hint of caramelized sugar.
Once it comes out of the oven, let the pie cool for at least two hours. This is where most people get impatient. Cutting too soon will give you a runny slice, no matter how well it baked. As it cools, the filling sets into that perfect, spoonable texture that holds its shape on the plate.
Using Frozen Huckleberries Without Ruining the Pie
Frozen huckleberries work beautifully in this recipe, and in many parts of the country, they’re the only option. The key is handling them gently. Rinse off any surface ice and drain them well. You don’t need to fully thaw them, but you do want to remove excess water.
Because frozen berries release more juice as they bake, the optional shredded apple becomes especially helpful here. Stick to the full resting time before baking, and resist the urge to reduce the tapioca unless you’ve had issues with gumminess in the past.
Flavor Variations That Make Sense
If you enjoy warm spices, a small pinch of cinnamon can add depth without turning the pie into something else. Keep it subtle. Huckleberries should stay front and center.
For a crumb-topped version, replace the top crust with a simple mixture of flour, brown sugar, and butter, sprinkled generously over the filling. This version is especially good served slightly warm.
You can also adjust the sweetness depending on your berries. Wild huckleberries vary a lot. If they’re extremely tart, an extra tablespoon or two of sugar can help balance things without masking the flavor.
Make-Ahead, Storage, and Leftovers
You can prepare the filling and refrigerate it for up to a day before baking. Just give it a gentle stir before pouring it into the crust. The baked pie keeps well, covered, in the refrigerator for up to a week.
To reheat, warm slices in a 300°F oven until just heated through. This keeps the crust crisp, unlike the microwave. The pie also freezes well once baked. Wrap it tightly, and thaw overnight in the refrigerator before reheating.
How to Serve Wild Huckleberry Pie
This pie is best slightly warm or at room temperature. A scoop of vanilla ice cream melts into the filling and softens the tartness, while lightly sweetened whipped cream keeps things classic. It’s equally at home on a holiday table or served on a quiet afternoon when you just want something homemade and comforting.

In the end, wild huckleberry pie isn’t about perfection. It’s about trusting your instincts, watching the oven, and letting the pie cool while you clear the counter and pour yourself a cup of coffee. When you finally sit down with that first slice, it tastes like care, patience, and a little bit of summer saved for later.
FAQ
Can I use frozen huckleberries instead of fresh?
Yes, frozen huckleberries work very well in this pie. Rinse off any ice crystals and drain them well before using so you don’t add extra water to the filling. You may notice the filling looks looser before baking, but it will thicken as the pie cools.
Why is my huckleberry pie runny after baking?
This usually means the pie was sliced while still warm or the filling didn’t bubble long enough in the oven. Huckleberry pie needs time to cool so the thickener can fully set. Letting it rest for at least two hours makes a big difference.
Do I really need to add the apple to the filling?
No, the apple is optional and won’t change the flavor of the pie. It helps absorb extra juice and gives the filling a more stable texture, especially if your berries are very juicy. If you skip it, just be sure to measure the thickener carefully.
How do I know when wild huckleberry pie is fully baked?
Look for thick, slow bubbles rising through the lattice or vents, not thin liquid. The crust should be golden brown, and the filling should look glossy and slightly thickened. If the bubbles are active, the pie is doing what it should.
Print
wild huckleberry pie
- Total Time: 1 hour 25 minutes
- Yield: 8 slices 1x
Description
This wild huckleberry pie is a classic comfort dessert made with a flaky crust and a rich, tart berry filling that sets beautifully once cooled.
Ingredients
- 1 box refrigerated pie crusts (2 crusts)
- 4 cups wild huckleberries
- 1/2 cup granulated sugar
- 1/2 cup brown sugar
- 1/4 cup quick-cooking tapioca
- 1 1/2 teaspoons orange zest
- 1 tablespoon orange juice
- 1/4 teaspoon salt
- 1 tablespoon butter
- 1 tablespoon milk
- 2 teaspoons sugar
Instructions
- Preheat the oven to 375°F and line a 9-inch pie plate with one pie crust, letting the excess hang over the edge.
- In a large bowl, mix the granulated sugar, brown sugar, tapioca, orange zest, orange juice, and salt until combined.
- Gently fold in the huckleberries until evenly coated, then let the filling rest for 15 minutes.
- Pour the filling into the prepared crust and dot the top with butter.
- Cut the remaining pie crust into strips and arrange in a lattice pattern over the filling, then crimp the edges.
- Brush the crust with milk and sprinkle with sugar, then cover the edges with foil.
- Bake for about 1 hour, removing the foil during the last 15 minutes, until the filling is bubbling and the crust is golden.
- Remove from the oven and let the pie cool for at least 2 hours before slicing.
Notes
- If using frozen huckleberries, rinse off any ice crystals and drain well before using.
- Letting the filling rest before baking helps prevent a runny pie.
- For cleaner slices, allow the pie to cool completely before cutting.
- Leftover pie can be stored covered in the refrigerator for up to one week.
- Prep Time: 15 minutes
- Cook Time: 1 hour
- Category: Dessert
- Method: Baking
- Cuisine: American
Nutrition
- Serving Size: 1 slice
- Calories: 275
- Sugar: 27 g
- Sodium: 182 mg
- Fat: 8 g
- Saturated Fat: 4 g
- Unsaturated Fat: 4 g
- Trans Fat: 0 g
- Carbohydrates: 53 g
- Fiber: 2 g
- Protein: 1 g
- Cholesterol: 11 mg