
Irresistible Cheesecake Mousse Cups: Easy, Delicious Dessert

Imagine you’re hosting friends and someone asks, “What’s the secret to that creamy dessert?” Cheesecake mousse cups are the answer. They mix the smoothness of cheesecake with the lightness of mousse, all without baking.
Picture arranging colorful cups on a table, each a tiny masterpiece. The process is simple, perfect for busy nights or weekend gatherings. It’s just a quick mix-and-layer.
Key Takeaways
- Cheesecake mousse cups combine the best of two desserts: creamy cheesecake and airy mousse, ready in under 30 minutes.
- No-bake recipes save time—like the cookie-crust chocolate mousse pie that cuts prep time by 30 minutes.
- Over 30 creative recipes let you explore flavors from tangy strawberry to rich triple chocolate, all in individual servings.
- Perfect for any occasion, from casual dinners to parties, with options like aquafaba-based vegan versions.
- Store them safely in airtight containers for 2-3 days, and transport them with care using sturdy containers to keep layers intact.
What Are Cheesecake Mousse Cups?
Imagine a dessert that mixes the creamy cheesecake with the light mousse. It’s all in a portable, no-bake package. Cheesecake mousse cups are dessert cups that combine two iconic treats into one. They offer the creamy cheesecake base and a whipped mousse layer for a silky yet airy texture.
The Perfect Balance of Cheesecake and Mousse
These mini masterpieces start with a cheesecake-inspired base. It’s rich with cream cheese and sugar. Then, a mousse layer is added, using whipped cream or yogurt for a fluffy contrast.
The result is a dessert that’s neither too dense nor too light. It’s perfectly balanced. Each portion fits in the palm of your hand, ready to serve chilled.
Why Individual Dessert Cups Are Trending
“Searches for individual desserts rose 150% on Pinterest in 2020,” says a 2023 food trend report.
Portion control and presentation are key. dessert cups look great in photos, making them social media favorites. They’re also practical: no sharing disputes, easy cleanup, and customization for dietary needs.
They’re perfect for gatherings, eliminating the hassle of slicing a full cheesecake.
The Appeal of No-Bake Desserts
- No oven required—perfect for summer or small kitchens
- Ready in 15 minutes, set in 3+ hours (no waiting for baking times)
- Easier adjustments: swap sugar for honey, or add mix-ins like berries or nuts
These factors make cheesecake mousse cups a win for busy hosts. No messy baking, just mix, layer, and chill.
Print
cheesecake mousse cups
- Total Time: 1 hour 15 minutes
- Yield: 6–8 individual mousse cups 1x
- Diet: Vegetarian
Description
Irresistible Cheesecake Mousse Cups combine the creamy richness of cheesecake with the light, airy texture of mousse—all in an elegant, no-bake format. These single-serve desserts are perfect for parties, casual get-togethers, or a quick sweet indulgence. Easy to prepare and endlessly customizable, they’re a delightful treat that looks as good as it tastes.
Ingredients
Mousse Base:
8 oz (225 g) cream cheese, softened
¾ cup (90 g) confectioners’ sugar
1 tsp vanilla extract
1 cup (240 ml) cold heavy cream
Optional Crust:
½ cup (50 g) graham cracker crumbs
2 tbsp (30 g) unsalted butter, melted
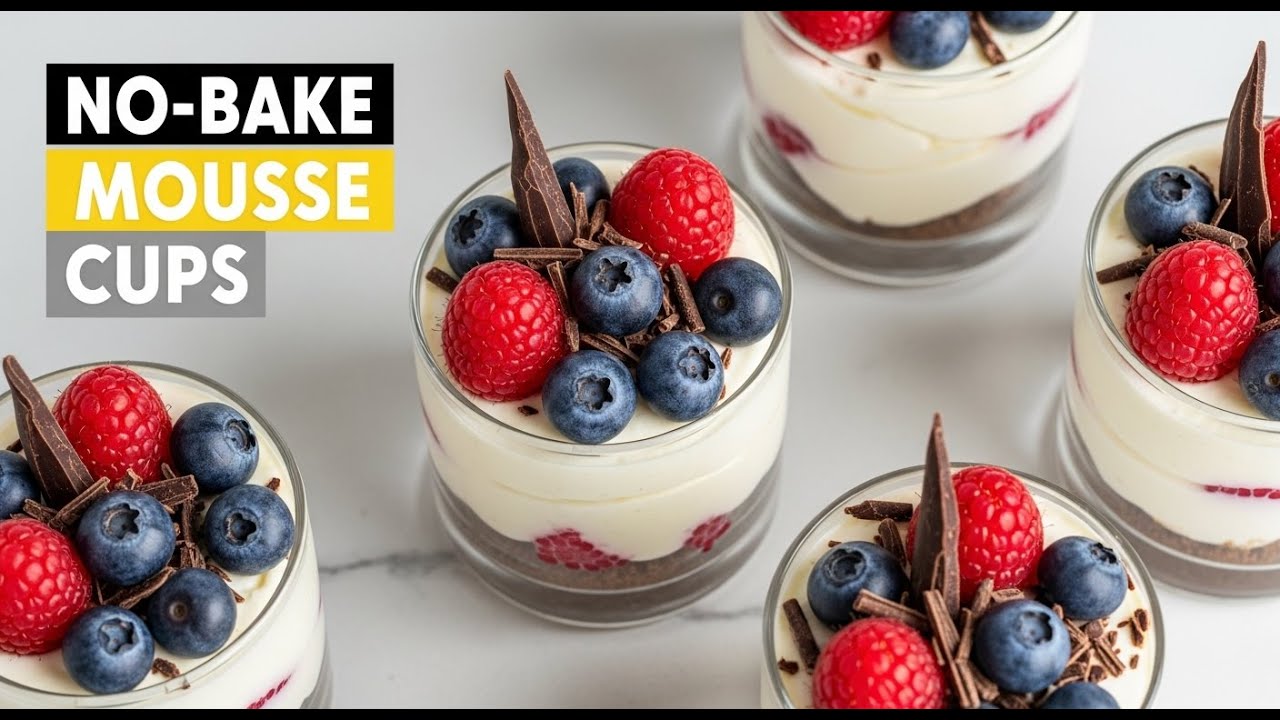
Optional Toppings:
Fresh berries
Chocolate shavings
Fruit purée or jam
Crushed cookies or nuts
Mint leaves or edible flowers
Instructions
-
(Optional) Prepare the Crust:
Mix graham cracker crumbs with melted butter. Press about 1 tbsp of the mixture into the bottom of each serving cup. Chill or bake at 375°F (190°C) for 10–12 minutes, then let cool completely. -
Prepare the Mousse Base:
In a large bowl, beat softened cream cheese, confectioners’ sugar, and vanilla extract until smooth and creamy. -
Whip the Cream:
In a separate chilled bowl, whip the heavy cream to stiff peaks using an electric mixer. -
Fold:
Gently fold the whipped cream into the cream cheese mixture using a silicone spatula, keeping the texture light and airy. -
Assemble:
Spoon or pipe the mousse into serving cups over the prepared crust (if using). Smooth the top or create decorative swirls. -
Chill:
Cover and refrigerate the assembled cups for at least 1 hour before serving. -
Garnish and Serve:
Add your favorite toppings like berries, chocolate, or a drizzle just before serving.
Notes
For best texture, chill mousse for 2–3 hours or overnight.
To avoid lumps, always use room-temperature cream cheese and cold heavy cream.
It can be stored in the refrigerator in an airtight container for up to 3 days.
Add 1 tsp lemon zest to the mousse for extra brightness.
- Prep Time: 15 minutes
- Cook Time: 1 hour
- Category: Dessert
- Method: No-Bake
- Cuisine: American
Nutrition
- Serving Size: 1 cup (about 120 g)
- Calories: 280 kcal
- Sugar: 18 g
- Sodium: 140 mg
- Fat: 20 g
- Saturated Fat: 12 g
- Unsaturated Fat: 7 g
- Trans Fat: 0 g
- Carbohydrates: 22 g
- Fiber: 0.5 g
- Protein: 4 g
- Cholesterol: 65 mg
The History Behind This Creamy Delight
Imagine a cheesecake dessert that began as a simple Greek gift for athletes. It has grown into today’s creamy mousse cups. This journey spans thousands of years, mixing cultures and new ideas. Ancient Greeks gave cheese-based treats to athletes, as noted by physician Aegimus. Later, the Romans adapted these recipes for religious events, as Cato the Elder wrote.
- 4th Century BCE: Greeks made cheese cakes for athletes, mixing cheese, honey, and herbs.
- 19th Century: French chefs mixed mousse techniques, creating the Charlotte Russe—a chilled, layered dessert with gelatin.
- 1872: William Lawrence invented cream cheese, leading to New York-style cheesecakes by the 1930s.
- 1990s–2000s: New twists like Japanese rare cheesecake and Basque-style emerged, focusing on light textures.
| Aspect | Ancient | Modern |
|---|---|---|
| Key Ingredient | Goat/sheep cheese, honey | Cream cheese, gelatin |
| Preparation | Baked with dried fruits | No-bake mousse layers |
| Serving | Large communal portions | Individual cups for personal servings |

Charlotte Russe’s chilled layers inspired today’s mousse cups. By the 1930s, New York chefs like Arnold Reuben perfected baked versions. Japan’s rare cheesecake (1990s) used egg whites for airy textures. This evolution from temple offerings to Instagram-worthy cups shows tradition meets innovation. Today, recipes embrace global flavors, making the cheesecake dessert a canvas for creativity.
Essential Ingredients for Perfect Cheesecake Mousse Cups
Choosing the right ingredients is key to creamy cheesecake mousse cups. Each ingredient impacts the dessert’s texture and taste. Let’s explore what you need.
Cream Cheese Options and Substitutes
Full-fat cream cheese is the classic choice for creamy cheesecake. But, reduced-fat versions can make it thinner. Mascarpone adds silkiness, while Neufchâtel is lower in fat. For dairy-free options, try coconut cream or cashew-based cheeses.
Sweeteners: Beyond Regular Sugar
- Confectioners’ sugar dissolves easily into mixtures.
- Honey or maple syrup adds natural sweetness without refined sugar.
- Stevia or erythritol offer low-calorie options.
Add-ins for Flavor Enhancement
Add vanilla extract, orange zest, or berry purees for flavor. A splash of espresso or Grand Marnier adds depth. For spice, try cinnamon or nutmeg.
Crust Ingredients and Alternatives
Graham crackers are a classic choice. But you can use chocolate cookies for a richer taste or gluten-free oats for dietary needs. Crushed nuts like almonds or pretzels add texture.
Kitchen Tools You’ll Need

Turning your kitchen into a dessert bar starts with the right tools. These essentials make sure your mini desserts are perfect every time.
Choose containers that are both functional and stylish:
| Glass Type | Capacity | Presentation Tip |
|---|---|---|
| Lowball Glasses | 8 oz (240ml) | Classic for layered mousse designs |
| Mason Jars | 8 oz | Cheery rustic touch for summer events |
- Electric mixer (or hand mixer) to whip cream to stiff peaks
- Silicone spatula for scraping bowls and folding ingredients
- Stainless steel bowl for chilling before whipping cream
- Measuring cups and spoons for precise ingredient ratios
No need for fancy tools—get creative with these tricks:
- Use disposable piping bags with star tips for swirls
- Snip a corner of a plastic bag for makeshift piping
- Add texture with a fork by dragging it across the surface
These tools make the process easier and keep mini desserts looking great. Use the right containers to show off layers and textures.
Step-by-Step Recipe for Basic Cheesecake Mousse Cups
Learn how to make cheesecake mousse cups with this easy guide. This recipe makes a smooth, no-bake dessert in under 2 hours.

| Ingredients | Amount |
|---|---|
| Cream cheese | 8 oz (softened at room temperature) |
| Confectioners’ sugar | ¾ cup (adjust to taste) |
| Vanilla extract | 1 tsp |
| Heavy cream | 1 cup (cold) |
| Graham cracker crumbs | ½ cup (for optional crust) |
- Crust (optional): Mix graham crumbs with melted butter. Press ¼-inch layer into 8 cups. Bake at 375°F for 10-12 minutes. Cool completely.
- Prepare mousse base: Beat softened cream cheese, sugar, vanilla, and salt until smooth. Add 1 tsp of lemon zest if desired.
- Whip cream: In a separate bowl, beat cold heavy cream until stiff peaks form. Fold into the cheese mixture gently to keep it airy.
- Layer and chill: Spoon mousse into cups (over crust if using). Cover and refrigerate at least 1 hour before serving.
Pro tip: Let cream cheese sit at room temperature for 10-15 minutes to ensure lump-free mixing.
These cheesecake mousse cups can be stored in the fridge for up to 2 days. You can adjust the sweetness by adding more powdered sugar or liqueur. Serve chilled with fresh berries or chocolate shavings.
The Secret to Achieving the Perfect Mousse Texture
Getting the right texture for your no-bake cheesecake mousse cups is key. It involves three main steps. Each step is important to keep the cream cheese, sweeteners, and whipped cream together.

Properly Incorporating Air into Your Mixture
Whipping cream until it’s stiff and then gently mixing it with the cheesecake base is the trick. Start by whipping on medium speed until it’s soft. Then, fold it slowly with a spatula. This way, you avoid losing the air that makes it light.
Temperature Considerations for Ingredients
- Cream cheese needs to be at room temperature for smooth blending.
- Chill heavy cream in the fridge for 24 hours to whip up easily.
- Keep the mix in a 40°F fridge for 2 hours before serving to set right.
Common Texture Mistakes to Avoid
Stay away from these mistakes to avoid a lumpy or watery texture:
- Graininess: Make sure cream cheese is fully softened and mixed until it’s smooth.
- Separation: Add powdered sweetener slowly while blending to keep everything together.
- Over-chilling: Don’t store no-bake cheesecake cups for more than 4 hours before serving. This keeps them soft.
By following these steps, your no-bake cheesecake will always have a silky, stable texture.
Creative Flavor Variations to Try
Turn cheesecake mousse cups into unique treats with these creative twists. Try global flavors, boozy additions, and more. These ideas let you make each cup special. Find flavors for any season, taste, or event.

Seasonal Fruit Inspirations
Use seasonal fruits to create bright flavors:
- Summer: Layer with macerated berries or mango chunks
- Fall: Add caramelized apples or pumpkin purée
- Winter: Infuse with blood orange zest or pomegranate arils
- Spring: Top with rhubarb compote or strawberry coulis
Chocolate Lover’s Options
For chocolate lovers, try these:
- Dark chocolate mousse with sea salt flakes
- White chocolate swirls with raspberries
- Hot cocoa-dusted tops
- Mocha mix with espresso and chocolate chips
Adding Spirits and Liqueurs
Make adult versions more exciting with these:
- Bailey’s Irish Cream for creamy depth
- Kahlúa for coffee-infused richness
- Chambord for fruity undertones
- Limoncello for a citrusy kick
International Flavor Profiles
| Profile | Ingredients | Prep Time | Servings |
|---|---|---|---|
| Italian Tiramisu | Mascarpone, espresso, cocoa | 30 mins | 8 |
| Japanese Matcha | Matcha powder, honey | 25 mins | 10 |
| Mexican Spiced | Cinnamon, chili flakes | 20 mins | 12 |
| Indian Cardamom-Rose | Ground cardamom, rose water | 25 mins | 16 |
These ideas show that cheesecake mousse cups are more than just dessert. They’re a blank canvas for your creativity. Use these tips to make a flavor that suits your mood or any event.
Stunning Presentation Ideas for Your Mini Desserts
Make your dessert cups stand out with these easy styling tips. Every mini dessert is a chance to impress, whether it’s a birthday or a simple treat. With a few presentation tricks, small bites can make a big impact.
If you love to enjoy a classic Tiramisu but want something individual and super fast, try this simple dessert cup recipe.

- Layered textures: Alternate cheesecake mousse with fruit purées or cookie crumbs for visual depth.
- Drizzle art: Use melted chocolate or caramel in a piping bag for zigzag patterns over the top.
- Garnish play: Top with edible flowers, mint leaves, or a dusting of cocoa powder for instant elegance.
Choose the right serving vessels for the occasion. Clear glass cups show off layers, while mason jars add a rustic feel. For holidays, use seasonal toppings like pomegranate seeds in winter or strawberries in summer.
Color coordination is key: bright fruit with dark chocolate or pastel hues for spring. Add a personal touch with toppings like crushed nuts, coconut flakes, or gold luster dust. Even a simple sprinkle of sea salt can enhance flavors and looks.
Remember, presentation is quick but makes a big difference. These tips turn simple mini desserts into stunning, Instagram-worthy treats with little effort.
Make-Ahead Tips for Party Planning

Hosting a party dessert spread? Cheesecake mousse cups are perfect no-bake treats. They’re easy to preassemble for stress-free entertaining. Plus, their individual portions make setup a breeze.
| Step | Time to Prepare | Storage | Notes |
|---|---|---|---|
| Crust Assembly | 10 mins | Airtight container at room temperature | Store separately from mousse |
| Mousse Mixing | 15 mins | Refrigerate in sealed bowls | Chill minimum 2 hours before layering |
| Final Assembly | 5 mins | Chill minimum of 2 hours before layering | Add fresh toppings 1 hour before serving |
Proper Storage Guidelines
Store crust crumbs in airtight containers to keep them crunchy. Refrigerate mousse layers in sealed bowls for 2-3 days max. Always cover cups with plastic wrap to avoid fridge odors. Keep the fridge at 34–38°F for best results.
How Far in Advance Can You Prepare
- Crust ingredients: Prep 3-4 days ahead
- Mousse base: Mix 1-2 days before your event
- Final assembly: Up to 3 days before serving
- Garnishes: Add berries or whipped cream 2 hours before guests arrive
Transporting Your Dessert Cups Safely
Use insulated coolers with gel packs for travel. Pack cups in rigid containers to prevent shifting. For car trips over 30 minutes, add a chilled ice pack. Always store upright to prevent leaks.
Nutritional Information and Dietary Adaptations

Changing your cheesecake to fit dietary needs doesn’t mean losing flavor. Here’s how to adjust recipes without losing texture or taste:
Low-Sugar and Keto-Friendly Options
- Use 1:1 monk fruit or erythritol instead of sugar. Avoid liquid sweeteners to prevent sogginess.
- Swap ½ cup of yogurt for high-fat cream cheese to boost fat content in keto versions.
- For protein, add 2 tbsp whey protein powder to the mousse layers.
Making Vegan Cheesecake Mousse Cups
- Replace dairy cream cheese with brands like Kite Hill or Daiya. Use full-fat coconut milk for a richer texture.
- Add 1 tbsp agar-agar to vegan mixtures for firmness. Blend 1 cup of soaked cashews for 2 minutes to mimic yogurt cream.
- Substitute honey with maple syrup in the crusts for sweetness.
Gluten-Free Crust Alternatives
- Swap rolled oats with Bob’s Red Mill gluten-free oats or almond flour blends.
- Bind mixtures with flaxseed meal (1 tbsp + 3 tbsp water) instead of eggs.
- Use gluten-free graham crackers like Glutino for pre-made crusts.
| Version | Calories | Protein | Carbs | Fat |
|---|---|---|---|---|
| Standard | 89 kcal | 10g | 7.7g | 2.7g |
| Keto | 95 kcal | 12g | 2g | 4.3g |
| Vegan | 78 kcal | 6g | 6g | 3.5g |
| Gluten-Free | 85 kcal | 9g | 8g | 2.5g |
“For vegan versions, always chill mixtures for at least 4 hours to achieve proper set,” says registered dietitian Sarah Lee.
Pro tip: Always test substitutions in small batches. Store all variations in airtight containers for up to 5 days. Freezing is safe for up to 3 months when wrapped individually.
Perfect Occasions to Serve These Individual Desserts
Individual desserts are perfect for any event where you want something easy and pretty. They’re great for big celebrations or just hanging out with friends. Imagine a summer barbecue with red, white, and blue mousse cups or a holiday brunch with lemon-zest treats.

| Occasion | Key Feature | Presentation Tip |
|---|---|---|
| 4th of July Parties | Colorful sprinkles match patriotic themes | Arrange cups in star-patterned trays |
| Book Clubs | Small portions encourage sharing | Pair with themed toppings like mint leaves for winter reads |
| Corporate Events | Easy to handle during networking | Use clear glass cups to showcase layers |
At weddings, pick flavors like lavender honey or dark chocolate to match the couple’s taste. You can make individual desserts in just 15 minutes for bridal showers or rehearsal dinners. For game nights, try cups with salted caramel drizzle to go with spicy snacks.
- Buffet displays: Offer 3-4 flavors so guests can choose their favorite
- Gifts: Wrap cups in cellophane for bridal or baby showers
- Corporate events: Use mini cups as part of office catering orders
These individual desserts are quick to make and look fancy. They chill in 2 hours, so they’re ready when guests arrive. From Fourth of July picnics to cozy brunches, these cups make any event special.
Pairing Your Cheesecake Mousse Cups with Beverages
Make your dessert cups even better by choosing the right drink. The perfect drink can make a simple treat unforgettable.

Coffee and Tea Suggestions
- Bold espresso is great with chocolate dessert cups, balancing their richness. 50% of dessert lovers agree.
- Try an iced matcha latte with fruit-topped mousse cups for a cool contrast.
- White tea’s floral notes pair well with berry-infused mousse cups.
- Sauternes: A 25% favorite for rich chocolate or vanilla mousse.
- Moscato d’Asti: Lightly sparkling with apricot notes for fruit variations.
Signature Cocktails to Complement
Try these crafted pairings for adult gatherings:
- Espresso Martini: Mix vodka, coffee liqueur, and a dash of Baileys for chocolate dessert cups.
- Berry Mojito: Muddle raspberries and mint with rum for summer fruit mousse cups.
For those who don’t drink alcohol, try sparkling water with lemon or lavender syrup.
Troubleshooting Common Issues
Even the simplest dessert can face problems. Here’s how to solve common issues with cheesecake mousse cups:

- Runny or Soft Texture:
Overmixing or under-chilling are common problems. Mix ingredients just until they’re combined. Then, chill for at least 6 hours. Adding 2 1/4 tsp of gelatin (bloomed for 5 mins) helps with stability. - Cracks or Gaps:
Don’t overbake—keep ovens at 325°F max. Cool mixtures slowly by turning off the heat and leaving the oven door a bit open. Avoiding steam pockets is key; beat cream cheese for just 1 minute on high. - Off-Flavors:
Too sweet? Cut sugar to 3/4 cup. Bland? Add vanilla or citrus zest. Too strong? Mix gently to blend layers without overmixing. - Uneven Layers:
Use piping bags for even layers. Let each layer set for 30 minutes before adding the next. For clear colors, chill ingredients first and use silicone spatulas.
Got a cracked top? Top it with whipped cream, fruit, or sweetened sour cream. Always use softened cream cheese (16 oz) and cold whipping cream. Remember, 40 minutes of prep plus 6-12 hours of chilling is key. Even small issues won’t spoil this easy dessert. Your guests will love its creamy, indulgent taste.
How Cheesecake Mousse Cups Compare to Traditional Cheesecake
Choosing between cheesecake mousse cups and classic baked versions depends on texture, prep time, and storage. Discover how no-bake cheesecake mousse cups compare to traditional methods.

“The lightness of mousse captures the creamy cheesecake flavor without the oven’s intensity,” say dessert enthusiasts.
Texture and Flavor Differences
Creamy cheesecake mousse has a light, airy texture thanks to whipped cream. Traditional baked cheesecakes are denser, with a firmer crumb. No-bake recipes keep flavors bright, unlike baking, which can dull some notes.
The Cheesecake Factory’s Lemon Meringue Cheesecake uses layers of lemon mousse and cream. This shows how mousse can highlight fresh ingredients without baking.
Ease of Preparation Comparison
- No-bake cheesecake skips oven steps, saving 15 minutes active time vs. traditional’s 3+ hours of baking and chilling.
- No need to preheat to 375°F or monitor oven temps, reducing kitchen work.
- Mousse avoids common baked cheesecake issues like cracks from overbaking or uneven cooling.
Storage and Shelf Life Considerations
Mousse cups last 2–3 days refrigerated, while traditional cheesecakes keep up to a week. For longer storage, wrap the mousse tightly and freeze it for up to a month. Thaw overnight in the fridge before serving. Traditional versions can also be frozen but require a longer thawing time.
What Readers Say: Top Tips from Those Who’ve Made These
Cheesecake mousse cups are a hit in home kitchens. Fans are sharing their best tricks. Here’s what real cooks recommend:
“Freezing cups at a 45° angle creates diagonal layers that look professional!” — Sarah L., Chicago
- Use a food processor to crush graham crackers for ultra-fine crumbs.
- Add 1 tbsp cream cheese to whipped cream for stable mousse layers.
- Let ingredients sit at room temperature for 2 hours before mixing to avoid lumps.
- Top with fresh berries for color and texture contrast.

| TIP | RESULT |
|---|---|
| Freeze crusts first | Prevents sogginess |
| Use Oreo crumbs for chocolate lovers | 43% of recipes include chocolate variations |
| Tap pans gently to settle layers | Reduces air bubbles |
| Experiment with mint extract | Popular in 6 crowd-pleaser recipes |
Many readers say cheesecake mousse cups are a hit at gatherings. “My holiday party guests asked for the recipe!” says Mark T., who uses a water bath to prevent cracks. Pro tip: Use 8-ounce cream cheese blocks for consistency. With 10 fruit-infused recipes and 15 chocolate options, there’s a flavor for every palate. Whether you’re making 4 or 16 servings, these tips turn homemade desserts into showstoppers.
Why Cheesecake Mousse Cups Deserve a Place in Your Dessert Rotation
Cheesecake mousse cups are more than just a sweet treat. They’re a game-changer for any kitchen. Their no-bake simplicity makes them perfect for quick party dessert setups or casual gatherings.
With ingredients like store-bought graham cracker crumbs and fresh raspberries, these mini desserts offer both homemade charm and convenience. They’re great for any event, from summer barbecues to holiday dinners. Their 8-hour chill time ensures they’re always ready when you need them.
These cups are incredibly adaptable, from seasonal fruit to chocolate layers. You can use pre-made phyllo dough or substitute jam for fresh toppings to save time. Tested pans like Williams Sonoma’s leak-proof design hold 10 cups, ensuring each portion is just right.
They cater to any dietary preference, thanks to options like keto-friendly sweeteners or vegan cream cheese. This makes them perfect for diverse guest lists.
These bite-sized treats eliminate the guesswork of portion sizes, reducing waste and pleasing every palate. Their presentation-ready format turns any table into a dessert buffet. Whether using a 9-inch springform pan or a budget-friendly option, the key is the 240ml serving size—just right for parties or solo indulgence.
Ready to experiment? Try the vanilla-lemon filling with macerated berries or a spiced chocolate variation. Share your creations online and inspire others to join the mini dessert trend. With under 30 minutes of hands-on prep and endless flavor tweaks, there’s no reason not to make these cups your go-to for any occasion.
FAQ
What are cheesecake mousse cups?
Cheesecake mousse cups are a mix of cheesecake’s tangy taste and mousse’s light feel. They’re easy to make, don’t need baking, and look great in any dish. They’re perfect for any event.
How do I achieve the perfect mousse texture?
For the right mousse texture, beat cream cheese and whipped cream well. Make sure your ingredients are at room temperature. Cold ingredients can make the mousse too thick.
What can I use as a crust for my cheesecake mousse cups?
You can use graham cracker crumbs or try other options like crushed cookies or nuts. The crust adds a nice crunch that goes well with the creamy mousse.
Can I make cheesecake mousse cups ahead of time?
Yes, they’re great for making ahead. Prepare the mousse and crust before, then assemble just before serving. Keep them in the fridge, covered, until you’re ready to serve.
What are some creative flavor variations I can try?
Try adding seasonal fruits, chocolate, or liqueurs for unique tastes. Lemon zest or chocolate can add a special twist. You can also use global flavors like matcha or cardamom.
How do I present my cheesecake mousse cups beautifully?
Use different dishes and layer the mousse nicely. Top with fruits, chocolate shavings, or flowers. Using color theory can make your desserts look amazing.
What is the advantage of serving individual desserts?
Serving individual desserts like cheesecake mousse cups makes hosting easier. They’re easy to serve and let guests control their portions. It’s a hit with today’s diners.
How can I transport cheesecake mousse cups safely?
Use special carriers or containers to transport them. Make sure they’re secure to avoid spills. Keep them at the right temperature for the best taste.
Are there any dietary adaptations available for cheesecake mousse cups?
Yes, you can make them healthier by using low-sugar sweeteners. For vegans, use plant-based cream cheese. You can also make gluten-free crusts for those with dietary needs.
What beverages pair well with cheesecake mousse cups?
They go well with coffee, tea, and cocktails. Pair chocolate mousse with dark coffee or fruity mousse with crisp .
What Are Our Readers Saying?
There are no reviews yet. Be the first one to write one.


