Red Velvet Crinkle Cookies: Fudgy Centers With Bakery-Style Cracks

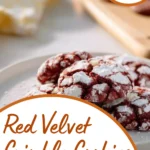
The first thing you notice isn’t the color — it’s the surface. A soft dome rises in the oven, then slowly splits, powdered sugar pulling apart to reveal deep red cracks underneath. The edges set just enough to hold their shape, while the centers stay dark, tender, and almost brownie-like. These are the cookies people grab twice, then ask who made them.
Red velvet crinkle cookies sit in a specific sweet spot. They’re richer than a sugar cookie, softer than a chocolate crinkle, and built for contrast — cocoa depth against vanilla warmth, crisp edges against a fudgy middle. The short bake is intentional. Pulling them at the right moment leaves the inside soft and slightly gooey, the way a bakery cookie should be, not dry or crumbly an hour later.
What makes this recipe dependable is that every step has a job. Brown sugar brings moisture and chew. Cocoa powder deepens the color without turning the dough bitter. The double sugar coating isn’t decoration — it’s what creates those dramatic cracks instead of flat, dull tops. Even the food coloring matters more than most people expect, and using the right amount keeps the dough balanced instead of wet or muted.
Before measuring anything, it helps to understand where these cookies can go wrong — and how to spot when they’re right. Once you know what to look for, the process becomes simple, repeatable, and exactly the kind of baking that earns a permanent place in your holiday rotation.
Table of Contents
The Ingredients That Actually Do the Heavy Lifting
Red Velvet Crinkle Cookies don’t rely on a long ingredient list — they rely on balance. Each component here has a clear job, and when one is off, the texture tells on you fast. The goal isn’t bold chocolate flavor or bright vanilla sweetness. It’s that unmistakable red velvet middle ground: cocoa-forward, soft, and rich without being heavy.
The fat and sugar combination sets the foundation. Butter provides flavor and structure, while using both brown and granulated sugar creates contrast — moisture and chew from the brown sugar, clean sweetness and crack definition from the white. This pairing is what keeps the cookies from baking up cakey or dry.
Cocoa powder matters more than people expect. It deepens color and adds bitterness just enough to offset the sugars, but too much pushes the cookies into chocolate territory. This recipe keeps cocoa restrained on purpose, letting the red velvet identity stay intact.
Eggs and vanilla round things out, binding the dough and softening the cocoa edge. Baking powder (not soda) gives lift without exaggerating spread, which is key for that puff-and-crack effect. Salt stays subtle, but without it, the cookies taste flat and overly sweet.
- Unsalted butter: Softened, not melted — melted butter destroys structure and causes overspreading.
- Light brown sugar: Adds moisture and chew; dark brown sugar will deepen flavor but mute the red color slightly.
- Granulated sugar: Essential for structure and crack formation, not just sweetness.
- Cocoa powder: Provides depth without overpowering; Dutch-process will soften bitterness but slightly darken the dough.
- Baking powder: Lifts gently; baking soda makes the cracks too aggressive and the texture cakier.
Red Food Coloring and the Sugar Coating — Where Red Velvet Crinkle Cookies Are Won or Lost
This is where Red Velvet Crinkle Cookies separate themselves from ordinary crinkle cookies. The red food coloring isn’t cosmetic — it affects moisture and dough consistency. Highly pigmented professional gel coloring delivers color without thinning the dough. Grocery-store gel or liquid works, but you’ll need more, and too much can tip the dough wet.
The sugar coating is structural, not decorative. Rolling the dough first in granulated sugar creates a dry outer shell that controls spread. The powdered sugar sticks to that layer, then splits dramatically as the cookie rises. Skip the first roll, and the powdered sugar melts. Rush the coating, and the cracks disappear.
- Professional red food coloring: Strong pigment with minimal moisture; adjust carefully if substituting with standard gel or liquid.
- Granulated sugar (for coating): Sets the surface and prevents the powdered sugar from dissolving.
- Powdered sugar: Creates the visual contrast and crack definition — a thick coat is intentional here.
These ingredients aren’t flexible personalities — they’re collaborators. Once you understand what each one contributes, the rest of the process becomes predictable, repeatable, and exactly the kind of baking that earns a recipe a permanent place in your kitchen.

Mixing Order Matters More Than You Think
The dough for these cookies should come together quietly and deliberately. When the butter and sugars are creamed properly, the mixture looks lighter in color and slightly aerated, almost fluffy around the edges of the bowl. As the eggs go in, the batter loosens and turns glossy, and the vanilla softens the cocoa aroma instead of competing with it.
Once the dry ingredients are added, everything changes. The sound of the mixer dulls, the batter thickens, and the color deepens into that unmistakable red velvet tone. This is where restraint matters. Stop mixing as soon as the flour disappears; the dough should feel soft but cohesive, not elastic. Overworking it here turns tender holiday cookies into dense bakery rejects.

Why the Sugar Roll Is Not Decoration — It’s Structure
Rolling the dough is less about looks and more about control. As each portion passes through granulated sugar, you should feel a slight grit clinging to the surface — that’s the first protective layer. The powdered sugar comes next, sticking thickly and completely, almost hiding the dough underneath.
When baked, this coating reacts before the inside does. The exterior dries just enough to resist expansion, forcing the cookie to crack as it puffs. You’ll see the sugar split open in the oven, revealing deep red seams beneath the white surface. If the powdered sugar looks thin or patchy before baking, the cracks won’t show later.

The Bake Window That Defines Red Velvet Crinkle Cookies
These cookies don’t finish baking in the oven — they finish on the pan. At around ten minutes, the tops should look set and cracked, but the centers will still appear slightly glossy. Press gently with a fingertip and the cookie should give, then spring back slowly, like a soft brownie.
The smell at this stage is cocoa-forward with warm vanilla, not sharp or burnt. Leave them longer and that aroma turns flat, the centers firm up, and the signature fudgy texture disappears. Pulling them early keeps the insides tender, letting the cookies settle into the bakery-style softness that makes Red Velvet Crinkle Cookies a repeat favorite on any holiday cookie tray.
Smart Variations That Still Respect the Cookie
Red velvet cookies don’t invite endless tinkering, but there are a few changes that work when done with intention. If you prefer a deeper cocoa note, you can increase the cocoa powder slightly, but keep it restrained. Pushing it too far turns the dough dark and dulls the red color that makes these cookies recognizable on a holiday tray.
If you only have salted butter on hand, it can be used without issue — just omit the added salt later so the sweetness stays balanced. Swapping dark brown sugar for light brown will make the cookies richer and softer, but it also shifts the color slightly toward burgundy. That’s fine for flavor, less ideal if presentation matters.
One substitution worth avoiding is reducing the sugar coating or skipping the granulated sugar step. Doing so causes the powdered sugar to melt into the dough, leaving you with flat tops and little contrast. That change doesn’t just affect looks — it alters how the cookies spread and set.
Serving These Cookies Where They Shine
These cookies are at their best once they’ve cooled just enough to set but are still tender in the center. Serve them slightly warm if possible, when the cracks are crisp but the middle remains soft and rich. A cold glass of milk cuts the sweetness cleanly, while coffee or espresso brings out the cocoa notes without overpowering them.

For holiday gatherings, Red Velvet Crinkle Cookies stand out on a mixed cookie platter. Their color adds contrast next to lighter cookies like shortbread or sugar cookies, and their fudgy texture offers something different from crisp, snap-style bakes. They also hold up well for gifting, staying soft for days when stored properly.
A Few Last Things Worth Remembering
If these cookies spread more than expected, the dough was likely too warm or the butter too soft. If they don’t crack, the sugar coating was too light or the oven temperature ran low. Small details make a visible difference here, but once you’ve baked them once, the cues become easy to read.
These are the kinds of cookies that reward attention without demanding perfection. When the powdered sugar splits and the red shows through, you know you got it right. Bake them once, take notes if you need to, and make them again — because the best recipes aren’t the ones you admire, they’re the ones you come back to.
Get inspired with more mouthwatering recipes! Follow me on Facebook and Pinterest for new cooking ideas every week.
FAQ
Why are my red velvet crinkle cookies soft in the middle?
That soft center is exactly how these cookies are meant to be. They finish setting as they cool on the baking sheet, which keeps them fudgy instead of dry. If they feel firm straight out of the oven, they were likely baked too long.
Why didn’t my cookies crack on top?
Crinkles usually fail when the sugar coating is too light or skipped. Rolling the dough first in granulated sugar, then heavily in powdered sugar, creates the dry surface that forces cracks as the cookies puff. An oven that runs cool can also reduce cracking.
Can I make red velvet crinkle cookies without food coloring?
Yes, you can leave the food coloring out and still get a soft cocoa cookie, but it will look more like a chocolate crinkle than classic red velvet. The flavor stays similar, but the visual contrast and holiday feel won’t be the same.
Can I chill the dough before baking?
This dough doesn’t need chilling and bakes best at room temperature. Chilling it will reduce spread and can limit cracking, making the cookies thicker and less dramatic on top. If your kitchen is very warm, a short chill can help, but it’s not required.
How do I store red velvet crinkle cookies so they stay soft?
Once completely cool, store them in an airtight container at room temperature. They’ll stay soft for several days, especially if you keep them away from dry air. Refrigeration isn’t necessary and can dry them out faster.
Why chilling matters more than you think
At first, the dough will feel soft, almost sticky. That’s normal. However, chilling it for at least two hours changes everything. The butter firms up, the flavors settle, and rolling becomes much easier. Skipping this step often leads to flat cookies with weak crinkles, so patience pays off here.
Baking for soft centers
Once chilled, roll the dough into balls, coat generously in powdered sugar, and space them apart on a lined baking sheet. Bake at 350°F until the cookies puff and crack, but the centers still look slightly soft. They’ll finish setting as they cool, which helps maintain that fudgy texture you want.
Print
Red Velvet Crinkle Cookies
- Total Time: 20 minutes
- Yield: 24 cookies 1x
- Diet: Vegetarian
Description
Bakery-style red velvet crinkle cookies with crackled sugar tops and soft, fudgy centers. These festive cookies bake quickly and stay tender, making them perfect for holiday trays, gifting, or an everyday sweet treat.
Ingredients
- 1/2 cup unsalted butter, softened
- 3/4 cup light brown sugar, packed
- 1/2 cup granulated sugar
- 2 large eggs, room temperature
- 2 teaspoons vanilla extract
- 1/2 teaspoon professional red food coloring
- 2 cups all-purpose flour
- 1/3 cup cocoa powder
- 1 1/2 teaspoons baking powder
- 1/2 teaspoon salt
- 1/2 cup granulated sugar, for coating
- 1/2 cup powdered sugar, for coating
Instructions
- Preheat the oven to 350°F and line a baking sheet with parchment paper.
- Cream the butter, brown sugar, and granulated sugar until light and fluffy.
- Add the eggs one at a time, then mix in the vanilla and red food coloring.
- In a separate bowl, sift together the flour, cocoa powder, baking powder, and salt.
- Add the dry ingredients to the wet ingredients and mix just until combined.
- Roll the dough into balls, coat first in granulated sugar, then heavily in powdered sugar.
- Place on the prepared baking sheet and bake until puffed and cracked but still soft in the center.
- Let the cookies cool briefly on the pan before serving.
Notes
- Food coloring varies in strength. Professional gel coloring is more concentrated; if using standard gel or liquid coloring, you may need to increase the amount slightly.
- Prep Time: 10 minutes
- Cook Time: 10 minutes
- Category: Dessert
- Method: Baked
- Cuisine: American
Nutrition
- Serving Size: 1 cookie
- Calories: 115
- Sugar: 14
- Sodium: 95
- Fat: 5
- Saturated Fat: 3
- Unsaturated Fat: 2
- Trans Fat: 0
- Carbohydrates: 17
- Fiber: 1
- Protein: 2
- Cholesterol: 20


 You’ll Crave Every Time 14")