
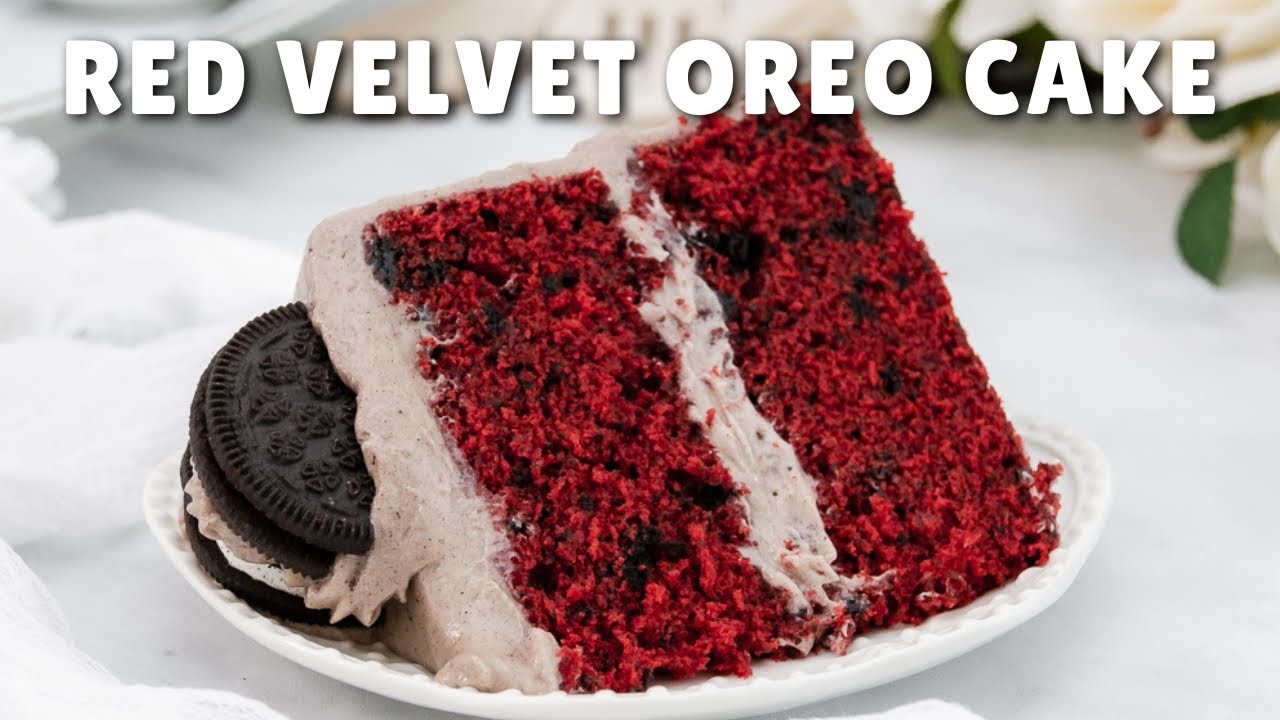
Savor the Rich Flavors of Red Velvet Oreo Cheesecake

Imagine a dessert that combines the vibrant charm of red velvet with the crunch of Oreo cookies, all wrapped up in a creamy cheesecake. This unique treat is not just a dessert—it’s an experience. Each bite offers a delightful contrast of textures: the crunch of the chocolatey Oreo crust giving way to a velvety, cream cheese-infused filling.
The magic of this recipe lies in its simplicity. Unlike traditional cheesecakes, this one skips the water bath, making it more accessible for home bakers. The result is a dessert that’s both rich and approachable, perfect for special occasions or even a cozy night in. With its balance of tangy cream cheese and sweet Oreo flavors, this cheesecake is sure to become a favorite.
Key Takeaways
- Combines the vibrant charm of red velvet with the crunch of Oreo cookies.
- Features a crunchy, chocolatey Oreo crust and a velvety, cream cheese-infused filling.
- Skips the traditional water bath, making it more accessible for home bakers.
- Perfect balance of tangy cream cheese and sweet Oreo flavors.
- Ideal for special occasions or cozy nights in.
Introduction to a Decadent Dessert
Discover a dessert that captivates the senses with its vibrant colors and irresistible flavors. This treat is a masterful blend of two beloved flavors, offering a unique experience with each bite. The combination of a crunchy cookie crust and a creamy, velvety filling creates a delightful contrast that will leave you wanting more.
The Inspiration Behind This Recipe
This recipe draws inspiration from a renowned cheesecake expert, blending creativity with classic techniques. By merging two iconic flavors, it creates something entirely new and exciting. The result is a dessert that feels both familiar and innovative, perfect for anyone looking to try something different.
What Sets This Cheesecake Apart
What makes this cheesecake truly special is its innovative approach to traditional baking. It skips the usual water bath, simplifying the process for home bakers. The use of room-temperature ingredients ensures a smooth texture, while expert tips help prevent cracks, resulting in a flawless finish. This dessert stands out not only in taste but also in its visually appealing presentation.
| Feature | This Cheesecake | Traditional Cheesecakes |
|---|---|---|
| Crust | Crunchy cookie base | Typically graham cracker |
| Baking Method | No water bath needed | Usually requires water bath |
| Texture | Smooth and creamy | Can be dense |
| Flavor Profile | Rich and tangy with a sweet crunch | Often sweeter, less complex |
This cheesecake is more than just a dessert; it’s an experience. With its unique flavor combination and simplified baking process, it’s a must-try for any dessert lover. Whether you’re a seasoned baker or a beginner, this recipe offers a delicious and impressive treat that’s sure to delight.
Ingredients and Must-Have Tools
To create this show-stopping dessert, you’ll need a few essential ingredients and tools. Let’s break it down into two main parts: the Oreo cookie crust and the creamy cheesecake filling.
Oreo Cookie Crust Essentials
The foundation of this dessert is the Oreo cookie crust. Here’s what you’ll need:
- 25 Oreo cookies, crushed into fine crumbs
- 1/4 cup granulated sugar
- 1/4 cup melted butter
For the best results, use a food processor or a Ziplock bag to crush the cookies evenly. This ensures a sturdy crust that holds the cheesecake perfectly.
Creamy Cheesecake Ingredients
The filling is where the magic happens. Here’s your shopping list:
- 32 oz cream cheese (room temperature)
- 1 cup granulated sugar
- 3/4 cup sour cream
- 4 large eggs
- 1 teaspoon red food gel dye
Using room-temperature cream cheese is crucial for a smooth batter. If you’re short on time, you can soften the cream cheese in the microwave for a few seconds.
Don’t forget the must-have tools:
- 8-inch springform pan
- Electric mixer
- Mixing bowl

With these ingredients and tools, you’re ready to start baking. The next section will guide you through the step-by-step preparation process.
Step-by-Step Preparation Guide
Creating this dessert is a breeze when you follow each step carefully. Timing and technique are key to achieving the perfect texture and flavor. Let’s break it down into two main parts: the crust and the filling.
Crafting the Perfect Crust
Start by preparing the crust. In a medium bowl, mix 25 crushed Oreo cookies with 1/4 cup of sugar and 1/4 cup of melted butter until well combined. Press the mixture firmly into the bottom of an 8-inch springform pan. Bake in a preheated oven at 350°F for 9-10 minutes. Let it cool completely before adding the filling.
Mixing and Baking the Red Velvet Filling
For the filling, beat 32 oz of room-temperature cream cheese until smooth. Gradually add 1 cup of sugar, mixing on low speed. Stir in 3/4 cup of sour cream and 1 teaspoon of red food coloring. Add eggs one at a time, ensuring each is fully incorporated before adding the next. Pour the batter over the cooled crust. Bake at 350°F for the first 5 minutes, then reduce the oven temperature to 325°F and continue baking for 55-65 minutes, until the edges are set and the center is slightly jiggly.

Mastering the Red Velvet Oreo Cheesecake
Perfecting the art of making a flawless dessert requires attention to detail and expert techniques. This section will guide you through the essential methods to ensure your cheesecake turns out perfectly every time.
Understanding the Key Techniques
The success of your dessert lies in mastering a few critical steps. Start by beating the cream cheese thoroughly until it’s smooth. This ensures a silky batter and prevents lumps. Next, incorporate eggs one at a time, allowing each to fully mix before adding the next. This technique avoids overmixing, which can lead to cracks.
Using room-temperature ingredients is crucial for a smooth batter. Take the time to soften your cream cheese and eggs properly. Another important step is proper cooling. After baking, let the cheesecake cool in the oven with the door slightly open. This gradual cooling prevents sudden temperature changes that can cause cracks.
Don’t overlook the importance of scraping the bowl. Ensure all ingredients are well incorporated for an even distribution of flavors and textures. These small adjustments can make a big difference in the final outcome, ensuring a creamy, crack-free dessert.

Tips for Preventing Cracks and Ensuring Creaminess
Achieving a flawless dessert requires more than just the right ingredients—it’s about mastering the technique. One of the most common challenges when baking cheesecakes is cracking, which can ruin both the appearance and texture of your dessert. However, with the right approach, you can ensure a smooth, crack-free finish every time.
The Water Bath Hack and Cooling Process
The secret to a crack-free dessert lies in maintaining the right environment during baking and cooling. A water bath hack is essential for creating a moist atmosphere that prevents cracking. Place a pan of water on the lower rack of your oven while baking to maintain humidity. After baking, allow the dessert to cool gradually in the oven for about an hour with the door slightly open. This slow cooling process prevents sudden temperature changes that can cause cracks.
| Tips for Success | Actions |
|---|---|
| Prevent Cracks | Use a water bath and gradual cooling |
| Ensure Creaminess | Avoid overmixing and overbaking |
| Maintain Moisture | Keep the oven door closed during baking |
“A crack-free dessert is not just about looks; it’s about preserving the delicate texture that makes each bite a delight.”

By following these expert tips, you can refine your baking process and achieve a perfectly creamy, crack-free dessert every time. Remember, patience is key—allowing your dessert to cool slowly ensures both appearance and texture remain flawless.
Variations and Ingredient Substitutions
Customizing your dessert to suit different tastes and dietary needs is easy with a few simple substitutions. Whether you’re looking for a lighter version or need to accommodate specific preferences, these tweaks will help you create a dessert that everyone can enjoy.
Customizing for Dietary Preferences
Explore creative ways to adapt the recipe to your needs:
- Swap the Oreo cookie crust with graham crackers or Biscoff cookies for a different flavor profile.
- Use low-fat or non-dairy cream cheese alternatives to reduce the calorie count without sacrificing creaminess.
- Replace sour cream with Greek yogurt for a tangier and healthier option.
- Opt for gluten-free cookies to make the crust suitable for those with gluten intolerance.
For a sweeter touch, top your dessert with whipped cream and a sprinkle of crushed cookies. These small changes allow you to personalize the recipe while maintaining its rich, velvety texture and delicious flavor.

Chilling, Storing, and Serving Your Dessert
Proper chilling and storing are essential to maintain the texture and flavor of your dessert. After baking, let it cool in the pan before refrigerating. This step ensures the dessert sets properly and retains its creamy texture.
Refrigeration and Freezing Best Practices
Refrigerate the dessert for at least 3-4 hours, preferably overnight. Cover it with foil and plastic wrap to prevent drying. For longer storage, freeze the dessert. Wrap it tightly in plastic wrap and place it in a freezer-safe bag.
When you’re ready to serve, thaw the frozen dessert in the refrigerator overnight. Let it sit at room temperature for about 30 minutes before slicing. This ensures a smooth, even texture.
For the best presentation, garnish with whipped cream and a sprinkle of sugar just before serving. This keeps the decorations fresh and vibrant. Proper storage is key to enjoying your dessert over several days.
Nutritional Information and Serving Ideas
Before indulging in this delightful dessert, it’s good to know what you’re treating yourself to. Each serving of this cheesecake packs about 423 calories, with a significant portion coming from fats and sugars. The cookie crust adds a nice crunch but also contributes to the calorie count.
Calories, Fats, and More
Here’s a breakdown of the key nutritional elements:
- Calories per serving: 423
- Total fats: 28g
- Saturated fats: 16g
- Cholesterol: 90mg
- Sodium: 350mg
- Total sugars: 34g
For those looking to make healthier choices, consider using low-fat cream cheese or a gluten-free cookie crust. These small tweaks can make a big difference without sacrificing flavor.
When it comes to serving, get creative! Drizzle melted chocolate over the top or add a dollop of whipped cream for extra flair. Fresh fruit like strawberries or blueberries can add a refreshing contrast to the richness of the cheesecake.

Remember, portion control is key. A smaller slice can be just as satisfying, especially when paired with a warm beverage like coffee or tea.
With these tips, you can enjoy your dessert while keeping both taste and health in mind. Whether it’s a special occasion or a cozy night in, this cheesecake is sure to impress!
Expert Tricks and Dessert Styling Tips
Elevate your dessert game with these expert tricks and styling ideas that will make your creation stand out. Whether you’re a novice or a seasoned baker, these tips will help you impress your guests with both flavor and presentation.
Start by achieving perfectly smooth slices using a warm, sharp knife. Dip the knife in hot water, wipe it clean, and slice. This ensures clean cuts and a professional look. For added flair, drizzle chocolate ganache over the top or pipe decorative swirls of whipped cream.
| Tips for Success | Actions |
|---|---|
| Smooth Slicing | Use a warm, sharp knife dipped in hot water |
| Decorative Touch | Drizzle with chocolate ganache or pipe whipped cream |
| Flavor Balance | Add a sprinkle of Oreo crumbs and a hint of vanilla |
| Professional Finish | Experiment with creative presentation styles |
Balance the flavors by sprinkling extra Oreo crumbs and adding a hint of vanilla. This enhances the dessert’s profile, making each bite more delightful. Don’t be afraid to experiment with presentation—try different patterns or toppings to give your dessert a unique, professional finish.

With these expert tricks, your dessert will impress both in taste and appearance. Remember, the key to a stunning dessert is in the details—so don’t hesitate to get creative and make it your own!
Conclusion
With its unique blend of flavors and textures, this dessert offers an unforgettable experience. By combining the charm of red velvet with the crunch of Oreo cookies, it creates a treat that’s both familiar and exciting. The absence of a traditional water bath makes it accessible for home bakers, ensuring a smooth and creamy texture without extra effort.
Your journey to creating this masterpiece begins with room-temperature ingredients in a mixing bowl, leading to a perfectly baked cake. Feel free to experiment with variations to suit your taste preferences. The result is a dessert that’s as visually stunning as it is delicious, making it a standout for any occasion. Share your experience and join the community of dessert enthusiasts who cherish the perfect blend of flavors and techniques.
FAQ
What pan size is best for this recipe?
A 9-inch springform pan is ideal for achieving the perfect height and texture. Make sure it’s properly greased to prevent sticking.
Why is a water bath necessary?
A water bath helps maintain even oven temperature, reducing the risk of cracks. It also ensures a creamy texture by preventing the edges from cooking too quickly.
Can I substitute cream cheese with another ingredient?
Cream cheese is essential for the tangy flavor. If needed, you can mix in a small amount of sour cream, but avoid full substitution for best results.
How long should the cheesecake cool before refrigeration?
Let it cool in the pan for about an hour. This step is crucial for setting the texture properly before refrigeration.
Can I use a different type of cookie for the crust?
While Oreos are traditional, you can experiment with other cookies like chocolate sandwich cookies. Just ensure they’re finely crushed for the crust.
How do I prevent the crust from becoming soggy?
Bake the crust for 8-10 minutes before adding the filling. This step helps keep it crisp and prevents sogginess.
What’s the best way to store leftovers?
Keep it in an airtight container in the fridge for up to 5 days. For longer storage, consider freezing slices and thawing when needed.
Can I make this recipe ahead of time?
Yes, it’s best made a day ahead. This allows the flavors to meld together and ensures a smooth, even texture when served.

Savor the Rich Flavors of Red Velvet Oreo Cheesecake
- Total Time: 6 hours (including chilling)
- Yield: 12 slices 1x
- Diet: Vegetarian
Description
This indulgent dessert fuses the deep, tangy richness of red velvet cheesecake with the sweet crunch of an Oreo cookie crust. With its eye-catching color and creamy texture, this cheesecake skips the traditional water bath for an easier, foolproof baking experience. It’s perfect for holidays, dinner parties, or cozy nights at home.
Ingredients
Oreo Cookie Crust:
25 Oreo cookies, finely crushed
¼ cup granulated sugar
¼ cup melted butter
Red Velvet Cheesecake Filling:
32 oz cream cheese, softened to room temperature
1 cup granulated sugar
¾ cup sour cream
4 large eggs
1 tsp red gel food coloring
1 tsp vanilla extract (optional)
Optional Garnishes:
Whipped cream
Extra crushed Oreos
Chocolate ganache drizzle
Fresh berries
Instructions
-
Preheat Oven: Set oven to 350°F (175°C).
-
Prepare the Crust: Mix crushed Oreos, sugar, and melted butter in a bowl. Press into the bottom of a greased 9-inch springform pan. Bake for 9–10 minutes. Let cool.
-
Make the Filling: Beat cream cheese until smooth. Gradually add sugar, then mix in sour cream and food coloring. Add eggs one at a time, beating just until incorporated. Optional: mix in vanilla.
-
Assemble & Bake: Pour filling over cooled crust. Bake at 350°F for 5 minutes, then lower oven temp to 325°F and bake an additional 55–65 minutes until center is just set.
-
Cool & Chill: Turn off oven and let cheesecake cool inside with the door slightly open for 1 hour. Refrigerate for at least 4 hours or overnight.
-
Serve: Top with whipped cream, crushed Oreos, or chocolate drizzle before serving.
Notes
Do not overmix the batter—this helps prevent cracks.
Use room-temperature ingredients for a smooth, lump-free texture.
A pan of water placed on a lower oven rack (not a full water bath) can help add moisture and reduce cracks.
Freeze slices individually wrapped for up to 2 months.
- Prep Time: 20 minutes
- Cook Time: 65 minutes
- Category: Dessert
- Method: Baking
- Cuisine: American
What Are Our Readers Saying?
There are no reviews yet. Be the first one to write one.


