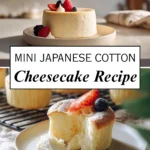
Mini Japanese Cotton Cheesecake That Feels Light as Air

There’s something especially comforting about baking a dessert that asks you to slow down just a little. The kind where you soften the cream cheese on the counter, listen to the mixer hum, and peek through the oven door more than once. That’s exactly what happens when you make Mini Japanese Cotton Cheesecake at home. These little cheesecakes aren’t rich and heavy. They’re soft, gently sweet, and almost cloud-like, the kind of treat that feels just right with an afternoon cup of tea or served after a family dinner when you want something light.
I first started making these mini versions when I wanted the magic of Japanese cheesecake without committing to a full-size cake. Smaller portions feel less intimidating, bake more evenly, and disappear fast once everyone realizes how airy and delicate they are. If you’ve ever been curious about Japanese-style cheesecake but worried it might be tricky, this version is a wonderful place to start.
Table of Contents
What Makes a Japanese Cotton Cheesecake Different
Japanese cotton cheesecake sits somewhere between a classic cheesecake and a soufflé. Instead of being dense and creamy like a New York–style cake, it’s lifted with whipped egg whites that give it a soft, bouncy texture. When you press the top gently, it springs back. When you cut into it, the crumb looks fine and tender, not heavy or wet.
The flavor is intentionally mild. You’ll taste cream cheese, a hint of vanilla or lemon, and just enough sweetness to feel balanced. That’s part of its charm. It doesn’t overwhelm your palate, which is why so many people describe it as light, fluffy, and almost melt-in-your-mouth.
Ingredients That Create the Fluffiest Texture
This recipe uses everyday ingredients, but how they work together matters.
You’ll need cream cheese that’s fully softened so it blends smoothly without lumps. Sour cream adds moisture and a gentle tang that keeps the flavor from feeling flat. Sugar is divided between the batter and the egg whites, helping with structure as well as sweetness. Egg yolks enrich the base, while the whites are whipped separately to create lift.
All-purpose flour gives just enough stability without making the cakes dense, and milk loosens the batter to the right consistency. A touch of vanilla extract or lemon juice brightens everything up without stealing the spotlight.
Ingredients
- 6 ounces cream cheese, softened
- ⅓ cup sour cream
- 3 tablespoons granulated sugar
- 2 large egg yolks
- 2 tablespoons all-purpose flour, sifted
- ⅓ cup whole milk
- 2 large egg whites
- 4 tablespoons granulated sugar
- 1 teaspoon vanilla extract or lemon juice

The Method That Matters More Than the Recipe
Building the Base Batter
Start by letting the cream cheese and sour cream come fully to room temperature. This step makes a noticeable difference. When you mix them with the first portion of sugar, the texture should turn smooth and creamy, with no resistance from cold spots.
Once the egg yolks go in, the batter becomes richer and slightly thicker. After adding the sifted flour, you’ll notice it tighten a bit. That’s expected. When the milk is mixed in, everything loosens into a silky batter that pours easily but still has body.
Whipping and Folding the Meringue
The egg whites are where the magic happens. As you whip them with the remaining sugar, watch for soft peaks. When you lift the whisk, the whites should form a peak that gently folds over on itself instead of standing stiff. This stage gives you lift without dryness.
When folding the meringue into the batter, move slowly and gently. You’re aiming to keep as much air as possible. The finished batter should look light and fluffy, almost like a thick foam.

Why the Water Bath Is Non-Negotiable
A water bath helps regulate heat and keeps the cheesecake from baking too aggressively. It creates a moist oven environment that encourages even rising and prevents cracks. Pour hot water into a larger pan and place your filled mini pans inside before baking. This small extra step makes a big difference in texture.

Baking Temperatures, Timing, and Doneness Cues
These mini cheesecakes bake in two stages. The initial higher temperature helps them rise, while the lower temperature allows them to set gently without collapsing. As they bake, you’ll see them puff slightly and turn pale golden on top.
They’re done when the centers jiggle softly, not wet or sloshy. A gentle press should feel springy, not fragile. Overbaking is the fastest way to lose that cotton-soft texture, so trust what you see and feel more than the clock.
Common Mistakes and How to Avoid Them
If your cheesecakes deflate a little after baking, that’s normal. A dramatic collapse, however, usually means the egg whites were overwhipped or the batter was folded too roughly.
Dense texture often comes from rushing the mixing or baking at too high a temperature. Skipping the water bath can also lead to cracked tops and uneven baking. Taking your time and following the visual cues goes a long way toward success.
Flavor Variations That Still Keep the Cake Light
You can easily customize these without sacrificing their airy feel. A little lemon zest adds brightness, while matcha powder brings a subtle earthy note if you enjoy that flavor. For chocolate lovers, a small amount of cocoa powder works, but keep additions light so the structure stays intact.
When serving, simple toppings are best. A dollop of lightly sweetened whipped cream or fresh berries complements the softness without weighing it down.
Dietary Variations
For a gluten-free option, cornstarch can replace the all-purpose flour in equal measure. It keeps the texture tender while avoiding gluten. Reducing sugar slightly is possible, but be cautious, as sugar helps stabilize both the batter and the meringue.
Dairy-free versions are harder to replicate with the same results, as cream cheese plays a central role in flavor and structure.
Serving, Storage, and Make-Ahead Tips
These mini cheesecakes are lovely served slightly warm or fully chilled, depending on your preference. Chilling them firms the texture just a bit and deepens the flavor.
Store leftovers in the refrigerator, covered, for up to three days. They’re best enjoyed fresh, but you can make them a day ahead for gatherings. Let them come to room temperature briefly before serving for the softest bite.
There’s something quietly satisfying about pulling a tray of these from the oven and watching them settle. Mini Japanese Cotton Cheesecake may look delicate, but with a little patience and care, it’s a dessert you can make with confidence. It’s the kind of recipe that feels gentle and reassuring, the kind you’ll come back to when you want something light, comforting, and made with your own hands.

Get inspired with more mouthwatering recipes! Follow me on Facebook and Pinterest for new cooking ideas every week.
FAQ
Why did my mini Japanese cotton cheesecake deflate after baking?
A slight deflation is completely normal with this style of cheesecake. Because it’s lifted by whipped egg whites, it will naturally settle as it cools. As long as the texture inside is soft and airy, a little shrinkage isn’t a problem.
How do I know when the mini cheesecakes are fully baked?
They’re ready when the tops look set and lightly golden and the centers jiggle gently, not wet or loose. If you lightly press the top, it should spring back softly. Overbaking can make them dry, so it’s better to stop while they still feel tender.
Can I make Japanese cotton cheesecake without a water bath?
You can, but the texture will be less consistent. The water bath helps regulate oven heat and keeps the cheesecakes from cracking or baking too quickly. If you skip it, expect a firmer texture and more browning on top.
Can I use cornstarch instead of flour in this recipe?
Yes, cornstarch works well and is a good gluten-free option. Use the same amount as the flour and sift it well before adding. The texture will stay light and delicate, very close to the original version.
Print
Mini Japanese Cotton Cheesecake
- Total Time: 40 minutes
- Yield: 12 pieces 1x
- Diet: Vegetarian
Description
Light, airy mini Japanese cotton cheesecake with a soft, cloud-like texture and gentle sweetness. A comforting homemade dessert that feels delicate yet simple to make.
Ingredients
- 6 ounces cream cheese, softened
- 1/3 cup sour cream
- 3 tablespoons granulated sugar
- 2 large egg yolks
- 2 tablespoons all-purpose flour, sifted
- 1/3 cup whole milk
- 2 large egg whites
- 4 tablespoons granulated sugar
- 1 teaspoon vanilla extract or lemon juice
Instructions
- Preheat the oven to 360°F and sift the flour; prepare a water bath by setting a larger pan aside.
- Allow the cream cheese and sour cream to come fully to room temperature, then mix until smooth with the first portion of sugar.
- Add the egg yolks and mix until fully incorporated and silky.
- Stir in the sifted flour, then gradually add the milk and vanilla extract or lemon juice until the batter is smooth.
- Whip the egg whites with the remaining sugar to soft peaks, watching for a glossy, gently folding peak.
- Gently fold the meringue into the batter in stages, keeping the mixture light and airy.
- Pour the batter evenly into mini baking pans and place them into the prepared water bath.
- Bake at 360°F for 10 minutes, then reduce the temperature to 300°F and continue baking for another 10 minutes until softly set.
- Remove from the oven and let cool slightly before serving with whipped cream or fresh fruit.
Notes
- A slight deflation after baking is normal for cotton cheesecake and does not affect texture.
- Use cornstarch in place of flour for a gluten-free option, using the same amount.
- Avoid overwhipping the egg whites, as stiff peaks can lead to a dense texture.
- Prep Time: 20 minutes
- Cook Time: 20 minutes
- Category: Dessert
- Method: Baking
- Cuisine: Japanese
Nutrition
- Serving Size: 1 piece
- Calories: 160
- Sugar: 11 g
- Sodium: 120 mg
- Fat: 10 g
- Saturated Fat: 6 g
- Unsaturated Fat: 3 g
- Trans Fat: 0 g
- Carbohydrates: 14 g
- Fiber: 0 g
- Protein: 4 g
- Cholesterol: 65 mg


 You’ll Crave Every Time 15")