
Creamy Strawberry Shortcake Cheesecake Delight

There’s something magical about creating a dessert that brings smiles to the faces of your loved ones. Imagine a treat that combines the classic charm of a beloved cake with the luxurious creaminess of a rich filling. This recipe does just that, offering a delightful blend of flavors and textures that’s perfect for any occasion.
At its core, this dessert features a light buttery base, a smooth and creamy layer, and a fresh, fruity topping. It’s a harmonious combination that feels indulgent yet balanced. Whether you’re hosting a gathering or simply treating yourself, this recipe is designed to impress.
Ready to dive into the details? Keep reading for step-by-step instructions, pro tips, and inspiration to make this dessert your own. Let’s create something unforgettable together!
Key Takeaways
- Combines the classic appeal of a cake with the richness of a creamy filling.
- Features a light base, smooth layer, and fresh topping for a balanced treat.
- Perfect for gatherings or personal indulgence.
- Includes detailed instructions and pro tips for best results.
- Versatile and adaptable to different occasions.
Introduction to a Unique Strawberry Dessert
Discover a dessert that redefines indulgence with its perfect blend of textures and flavors. This recipe stands out by combining the freshness of seasonal fruit with the richness of a creamy layer. It’s a treat that’s both elegant and approachable, making it ideal for any occasion.
Why You’ll Love This Recipe
What makes this dessert special is its balance. The light, buttery base pairs perfectly with the smooth, creamy filling. Topped with fresh fruit, it’s a harmonious blend of flavors that’s neither too heavy nor too sweet.
Using quality ingredients is key. Every cup of cream and each piece of fruit contributes to the final taste. When you choose the best produce, you ensure the dessert shines with peak seasonal flavor.
Key Ingredients Overview
Here’s a breakdown of the essential components that make this dessert unforgettable:
| Ingredient | Role |
|---|---|
| Fresh Strawberries | Adds natural sweetness and a burst of flavor. |
| Heavy Cream | Creates a rich, smooth texture for the filling. |
| Butter | Provides a light, flaky base for the dessert. |
| Vanilla Extract | Enhances the overall flavor profile. |
These ingredients work together to create a dessert that’s as beautiful as it is delicious. Stay tuned for detailed instructions and styling tips in the next sections!
The Story and Inspiration Behind This Dessert
Every great recipe has a story, and this one is no exception. This dessert was born from a love for family traditions and the vibrant flavors of the season. It’s a blend of cherished memories and innovative techniques, creating something truly special.

Origins and Seasonal Charm
The inspiration for this recipe comes from a family tradition of celebrating summer with fresh, seasonal ingredients. Imagine the aroma of ripe fruit filling the kitchen, paired with the comforting scent of freshly baked goods. It’s a moment that captures the essence of togetherness.
Over time, this recipe evolved, blending classic flavors like vanilla with modern twists. The use of extract enhances the depth of flavor, while traditional baking methods ensure a perfect texture. It’s a nod to the past while embracing the present.
Seasonal charm plays a big role in this dessert. The influence of regions like Newfoundland, where fresh produce is abundant, adds a unique touch. It’s a reminder of how nature’s bounty can elevate even the simplest recipes.
“The best recipes are those that tell a story—one that connects us to our roots and brings joy to the table.”
| Element | Role in the Recipe |
|---|---|
| Vanilla Extract | Adds a warm, aromatic flavor. |
| Time-Tested Techniques | Ensures a consistent, perfect texture. |
| Seasonal Ingredients | Brings freshness and vibrancy. |
This dessert is more than just a treat; it’s a celebration of heritage, innovation, and the beauty of the seasons. Whether you’re baking for a special occasion or simply indulging, it’s a recipe that tells a story worth savoring.
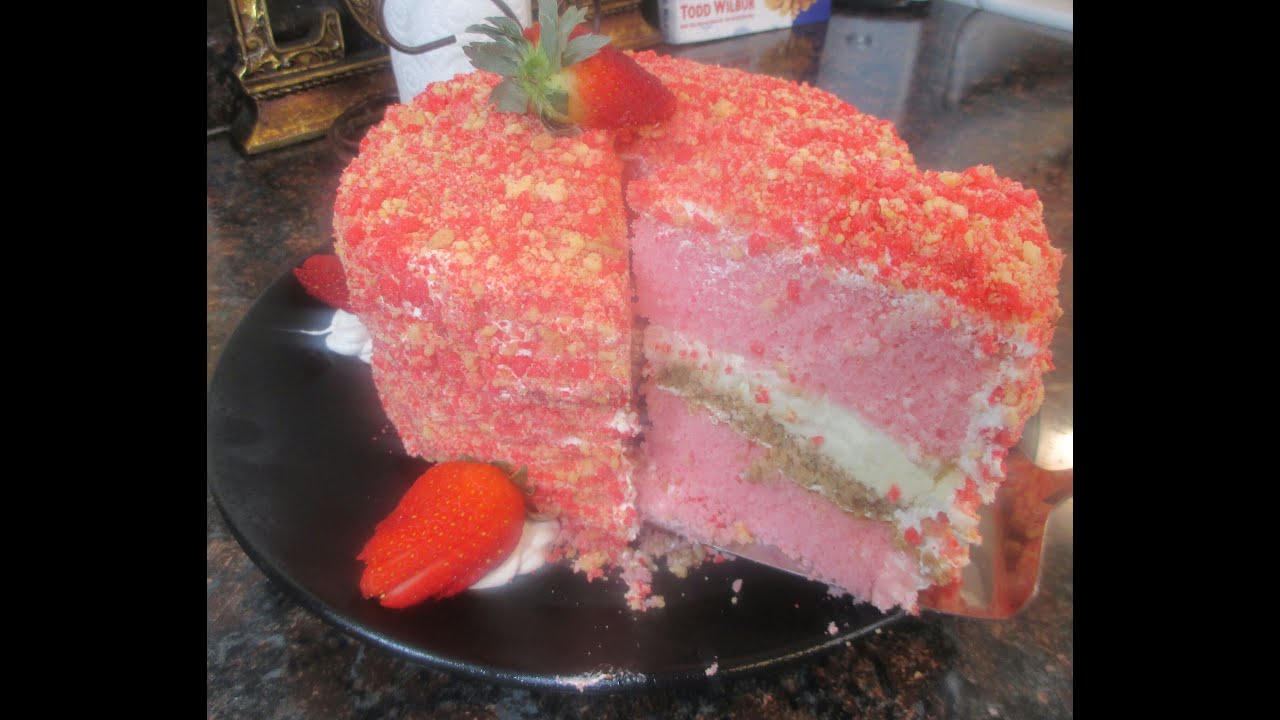
Exploring the Layers of Strawberry Shortcake Cheesecake
Master the art of layering flavors and textures to create a dessert masterpiece. This treat is built on three distinct components, each playing a vital role in its overall appeal. From the light base to the creamy center and fresh topping, every layer is crafted with care.

Vanilla Butter Cake Base
The foundation of this dessert is a light and fluffy vanilla butter cake. Its sturdy yet tender texture provides the perfect base for the other layers. Using quality ingredients like vanilla extract ensures a warm, aromatic flavor that complements the richness of the filling.
Creamy Cheesecake Layer
Next comes the smooth and indulgent cheesecake layer. Prepared with cream cheese, this component is carefully baked in a well-prepped pan to ensure even cooking. The result is a velvety texture that balances the sweetness of the other layers.
Strawberry Filling & Whipped Cream Topping
The final touch is a vibrant strawberry filling, sweetened with sugar and paired with airy whipped cream. This topping adds a burst of freshness and a hint of tartness, completing the dessert. The entire process comes together in just a few minutes, making it both efficient and rewarding.
| Layer | Key Ingredient | Role |
|---|---|---|
| Vanilla Butter Cake | Vanilla Extract | Provides a light, aromatic base. |
| Creamy Cheesecake | Cream Cheese | Adds richness and smooth texture. |
| Strawberry Topping | Sugar | Sweetens and enhances freshness. |
Step-by-Step Preparation of the Cake Base
Creating the perfect cake base is the foundation of any great dessert. This recipe ensures a light, buttery texture that pairs beautifully with the creamy layers above. Follow these steps to achieve a flawless base every time.
Mixing and Baking the Butter Cake
Start by creaming butter and sugar in a large bowl until light and fluffy. This step introduces air into the mix, which is essential for a soft texture. Add eggs one at a time, mixing well after each addition.
In a separate bowl, sift together flour and baking powder. Gradually fold this mixture into the wet ingredients, being careful not to overmix. Overmixing can lead to a dense cake, so stop as soon as the ingredients are combined.
Pour the batter into a prepared pan and bake at 325°F for 35-40 minutes. Use a toothpick to test for doneness—it should come out clean when inserted into the center.
Tips for a Light, Fluffy Texture
For the best results, use room temperature butter and eggs. Cold ingredients can hinder the creaming process. A powerful mixer ensures a consistent blend, while the right bowl size prevents spills and uneven mixing.
Measure your ingredients precisely. Too much flour can make the cake dry, while too little can cause it to collapse. Finally, avoid opening the oven door frequently during baking, as this can disrupt the cake’s rise.
With these techniques, you’ll create a cake base that’s both sturdy and tender, ready to support the layers above.
Crafting the Creamy Cheesecake Component
Achieving the perfect cheesecake layer requires precision and attention to detail. This component is the heart of the dessert, offering a rich and velvety texture that complements the other layers. Follow these steps to create a flawless cheesecake batter and ensure even baking.

Preparing a Smooth Cheesecake Batter
Start by softening cream cheese to room temperature. This ensures a lump-free mixture. In a large bowl, blend the cream cheese with powdered sugar until smooth. Add eggs one at a time, mixing well after each addition.
Incorporate tsp vanilla extract to enhance the flavor. For a silky texture, use a whisk or electric mixer on low speed. Avoid overmixing, as this can introduce air bubbles that affect the final texture.
Baking Techniques for Even Rise
Preheat your oven to 325°F and prepare your pan with parchment paper. Pour the batter into the pan and tap it gently to remove air pockets. Bake for 45-50 minutes, or until the edges are set but the center still jiggles slightly.
To prevent cracking, avoid opening the oven door during baking. Once done, turn off the oven and let the cheesecake cool inside for an hour. This gradual cooling helps maintain a smooth surface.
After baking, transfer the cheesecake to a wire rack to cool completely. Then, refrigerate it in the fridge for at least 4 hours to set. This step is crucial for achieving the perfect texture and making it easier to slice.
With these techniques, you’ll create a cheesecake layer that’s creamy, smooth, and perfectly balanced. It’s the ideal foundation for the dessert’s final assembly.
Assembling and Decorating the Multi-Layer Dessert
Assembling a multi-layer dessert is both an art and a science, requiring precision and creativity. This is where your hard work comes together, transforming individual components into a stunning centerpiece. Follow these steps to ensure your dessert looks as good as it tastes.

Layering Your Cake and Cheesecake
Start by carefully transferring the cake base to a serving plate using a long, sharp knife. This ensures the base remains intact. Next, gently place the cheesecake layer on top, aligning it evenly. Use a 1/4 cup measure to spread a thin layer of frosting between the layers for stability.
Take your time to ensure each layer is level. A steady hand and a sharp knife are essential for clean cuts. This attention to detail ensures the shortcake structure maintains its integrity.
Finishing Touches with Strawberry Garnishes
Once the layers are set, it’s time to add the finishing touches. Use a piping bag to create a whipped cream border along the top of the dessert. This not only adds visual appeal but also enhances the flavor.
Slice fresh strawberries and arrange them on top for a vibrant, decorative finish. For added flair, dust with a tsp of powdered sugar or drizzle with a light glaze. These small details elevate the presentation, making your dessert truly unforgettable.
Remember, assembly is where your dessert shines. Take your time, and let every layer “top” off the flavor profile perfectly.
Pro Tips, Ingredient Variations, and Storage Guidelines
Experimenting with ingredients can transform a classic recipe into something uniquely yours. Whether you’re adapting for dietary needs or exploring new flavors, these tips and variations will help you create a dessert that’s both delicious and personalized.
Substituting Ingredients for Unique Twists
For a gluten-free option, swap regular flour with almond or oat flour in the crust. This maintains the texture while catering to dietary restrictions. If you’re reducing fat, use Greek yogurt instead of heavy cream for a lighter filling.
Add depth to your dessert by incorporating high-quality chocolate into the filling. A tsp vanilla extract enhances the flavor, while a pinch of extra powder can balance the sweetness. These small tweaks make a big difference.

Best Practices for Assembly and Serving
When assembling, ensure each layer is level for a polished look. Use a sharp knife to cut clean slices, and serve chilled for the best texture. For a stunning presentation, garnish with fresh fruit or a drizzle of melted chocolate.
Proper storage is key to maintaining freshness. Keep the dessert in the fridge for up to 5 days, covered tightly. For longer storage, freeze individual slices wrapped in plastic wrap and foil. This ensures your creation stays fresh and delicious.
- Use gluten-free flour for a diet-friendly crust.
- Swap heavy cream with Greek yogurt to reduce fat.
- Enhance flavor with a tsp vanilla and quality chocolate.
- Store in the fridge for optimal texture and freshness.
Conclusion
Bringing together the best of classic and creamy textures, this dessert is a labor of love that’s worth every minute. The carefully tested steps in this post guide you through creating a multi-layer masterpiece. From the light base to the rich filling, each hour spent baking and chilling ensures a perfect result.
Quality ingredients like cheese and fresh fruit elevate the flavors, making every bite unforgettable. Whether you’re serving it at a gathering or enjoying it solo, this dessert is sure to impress.
We’d love to hear how your creation turns out! Share your feedback and explore more recipes in this post for continuous culinary inspiration. Savor every bite and keep experimenting with new sweet delights.
FAQ
Can I use frozen strawberries for this recipe?
Yes, you can use frozen strawberries. Just make sure to thaw and drain them well to avoid excess moisture in the filling.
How long does this dessert need to chill before serving?
It’s best to let it chill in the fridge for at least 4 hours, or overnight, to allow the layers to set properly.
Can I make this recipe gluten-free?
Absolutely! Substitute the all-purpose flour in the cake base with a gluten-free flour blend for a delicious gluten-free version.
What’s the best way to store leftovers?
Keep leftovers covered in the fridge for up to 3 days. Ensure it’s stored in an airtight container to maintain freshness.
Can I use a different fruit instead of strawberries?
Yes, you can experiment with other fruits like raspberries, blueberries, or peaches for a unique twist on this dessert.
Is it possible to make this dessert ahead of time?
Yes, you can prepare it a day in advance. Just add the whipped cream and fresh fruit garnish right before serving.
What’s the secret to a smooth cheesecake layer?
Ensure your cream cheese is at room temperature and mix it thoroughly to avoid lumps. A stand mixer or hand mixer works best.
Can I use a store-bought cake base to save time?
Yes, a store-bought vanilla cake can be used as a shortcut, but homemade adds a fresher, more flavorful touch.

Creamy Strawberry Shortcake Cheesecake Delight
- Total Time: 6 hours (including chilling)
- Yield: 12 servings 1x
- Diet: Vegetarian
Description
This stunning dessert combines a buttery vanilla cake base, a smooth cheesecake center, and a vibrant strawberry-whipped cream topping. Perfect for gatherings or special treats, it balances richness with fresh fruit flavor for a truly unforgettable bite.
Ingredients
Vanilla Butter Cake Base
½ cup (113g) unsalted butter, softened
1 cup (200g) granulated sugar
2 large eggs
1½ cups (190g) all-purpose flour
1½ tsp baking powder
½ cup (120ml) whole milk
1 tsp vanilla extract
Cheesecake Layer
16 oz (450g) cream cheese, softened
¾ cup (90g) powdered sugar
2 large eggs
1 tsp vanilla extract
Strawberry Topping
2 cups (300g) fresh strawberries, sliced
2 tbsp (25g) granulated sugar
1 cup (240ml) heavy cream
2 tbsp (15g) powdered sugar
½ tsp vanilla extract
Optional Garnish
Extra strawberries, sliced
1 tsp powdered sugar for dusting
Mint leaves (optional)
Instructions
-
Prepare the Cake Base: Preheat oven to 325°F (163°C). Grease and line a 9-inch springform pan. Cream butter and sugar until fluffy. Add eggs one at a time. Sift flour and baking powder, then add alternately with milk. Stir in vanilla. Pour into pan and bake for 35–40 minutes. Let cool completely.
-
Make the Cheesecake Layer: Beat softened cream cheese and powdered sugar until smooth. Add eggs one at a time, then vanilla. Pour over cooled cake base. Bake at 325°F for 45–50 minutes. Cool, then chill in the fridge for at least 4 hours.
-
Prepare the Topping: Toss strawberries with sugar and let sit for 10–15 minutes. Whip heavy cream with powdered sugar and vanilla until stiff peaks form.
-
Assemble the Dessert: Place cheesecake over cake base if baked separately. Top with whipped cream and strawberries.
-
-
Decorate: Pipe whipped cream around edges, arrange strawberries, dust with powdered sugar, and garnish with mint if desired. Serve chilled.
Notes
Use room temperature cream cheese for a lump-free batter.
For gluten-free, substitute all-purpose flour with a gluten-free blend.
This dessert improves in texture when chilled overnight.
You can swap strawberries with blueberries or peaches for seasonal variations.
- Prep Time: 30 minutes
- Cook Time: 1 hour 30 minutes
- Category: Dessert
- Method: Baking
- Cuisine: American
What Are Our Readers Saying?
There are no reviews yet. Be the first one to write one.


